Google Calendar sync was introduced in farmerswife version 7.2, and this "Calendar Sync" feature allows you to automatically sync farmerswife Bookings to a Google Calendar, giving the following advantages:
- Integrating farmerswife schedules with your enterprise scheduling system.
- Sharing calendars for a resources or group of resources with your team or clients who do not have farmerswife access.
- Receiving reminders and notifications directly from Google Calendar.
- The Calendar Sync takes place around every 1 minute.
- The following changes in farmerswife will be synced to Google Calendar:
New Bookings
Retiming a booking
Updating Involved
Changing the global status or checkpoint status of a booking
Deleting a booking in farmerswife will also remove it from Google Calendar.
Please note:
- The sync is one way only, from farmerswife to Google. Any changes made in Google Calendar will not be reflected back in farmerswife.
- After the integration is setup, farmerswife will only start syncing new events, once the Sync rule is “Active”. Previous events are not synced.
To configure the sync, you need to connect your farmerswife server with your Google Workspace, and then specify the Rules for which Bookings to Sync to Google.
The steps to do this are detailed below:
- Google Workspace Configuration (Workspace Super Admin )
- farmerswife Server and Toolbox Configuration
- Use Case 1: Syncing a Single User’s Calendar
- Use Case 2: Syncing a Single Resource’s Calendar
- Use Case 3: Sync Multiple Users or Resources (Groups) to a Shared Google Calendar
- Google Invite Integration
Google Workspace Configuration (Workspace Super Admin)
Setting up the Sync Project on Google Workspace will allow farmerswife to securely connect to your Google Workspace and sync Bookings.
Prerequisites:
Ensure you have:
A Google Workspace account (the sync is not possible on free Gmail accounts).
Super Admin access to the Google Cloud Console and Google Admin Console.
1. Create a new Project on Google Cloud Console
- Go to Google Cloud Console.
- In the top left corner click on the Open project picker. Then use in the New project option and enter a project name for the sync process.
- Click Create and wait for the project to be initialized.

2. Create a Service Account
- In the Google Cloud Console, navigate to IAM & Admin > Service Accounts.
- Click on the “+ Create service account” option.
- Provide a descriptive Service account name and description for the Service Account
- Click Create and Continue.
- Click Done.

3. Generate a Private Key for the Service Account
- In the Google Cloud Console, go to IAM & Admin > Service Accounts.
- In the Service Accounts list, locate the account you created. and click the Actions menu (three dots) and select Manage Keys > Add Key > Create new key.
- Choose Key type: JSON and click Create.

- Download the generated JSON file and store it securely, this will be required for authentication.
- If your farmerswife service is cloud hosted and managed by farmerswife, send the key securely to support@farmerswife.com
4. Enable the Google Calendar API
- In the Google Cloud Console, go to APIs & Services > Enabled APIs & Services.
- Click on “+ Enable APIs and Services”.
- Search for “Google Calendar API” and click on it and click on Enable to activate it for your project.


5. Configure Domain-Wide Delegation
- In the Google Admin Console, go to Security > Access and data control > API Controls.
- If Security is not visible, click Show More.
- Under API Controls, click Manage Domain-Wide Delegation.
- Click Add New and provide on the "Add a new client ID" pop-up window and open the JSON key file in a text editor and copy the number-info for "client_id" of the service account you created earlier and paste into the "Add a new client ID" field.
- OAuth Scopes: Add the following restricted scopes, separated by commas:
- https://www.googleapis.com/auth/calendar
- https://www.googleapis.com/auth/calendar.events

- Save your changes.
6. Create a Calendar where farmerswife will send the events (for Use Case 2 and 3 below) :
If you want to sync Resource bookings, or multiple users Bookings to a shared calendar in Google, you will need to create a new calendar (this is not needed for Use Case 1)
- On Google Calendar web use "Other Calendar +" > "Create new calendar" > Create.
- Go to "Shared with" > share with the people you need them to see the events in that new calendar (you can add more later)
- Check your Gmail, you will receive an invitation.

- You will also find the respective calendar ID from this new calendar scrolling down the settings, in case that you create a rule for this shared calendar.
farmerswife Server and Toolbox Configuration
If your farmerswife server is cloud hosted, Step 1 Upload the private key to the farmerswife server (fw Server Admin) will be done by the farmerswife support team.
If you manage your own server the farmerswife administrator will need to do this step
Upload the private key to the farmerswife server (fw Server Admin)
Rename the json file stored in step 3 of the google setup to "google-service-private-key.json” and upload to the fw Server app’s “system” folder.
Make sure you have added the google-service-private-key.json file. If not, you’ll encounter an error window when attempting to create a sync rule.
“failed to read jsonPrivateKeyPath” or “Missing JSON Private Key"
Also, make sure the file is named correctly, if there’s a typo or the name is incorrect, you’ll encounter an error like this:
Enable the Sync in farmerswife Toolbox
After the json file is uploaded (or confirmed by farmerswife support team to be in place for your cloud hosted system), in the farmerswife Desktop app, go to Toolbox> Settings > Server Setup > Check " Enable Calendar Sync" box.
If the checkbox is not available, try restarting your desktop client.
Scroll down to "Calendar Sync: Setup"
A new window will open "Calendar Sync Settings”.Set up the Sync Rules in the Toolbox
In the "Calendar Sync Settings”, Rules are added from the submenu on the top left
There are a number of options on Rule Types
- New Rule:
This option allows you to define specific Users and Resources you want to sync events for.
- New Rule (Users & Resources):
This option is designed for syncing All Users and Resources.
- New Exclude Rule:
This rule allows to create an exclusion rule for specific Objects or Event types, preventing them from being synced to the calendar.
e.g you could have a Rule all Users & Resources, and you could add an exclude rule for Shift Bookings, so then all bookings for all users and resources would be synced except Shift Bookings.
Rule List
When you have rules created they appear in a list where you can see the details, events sync status, deactivate and copy.
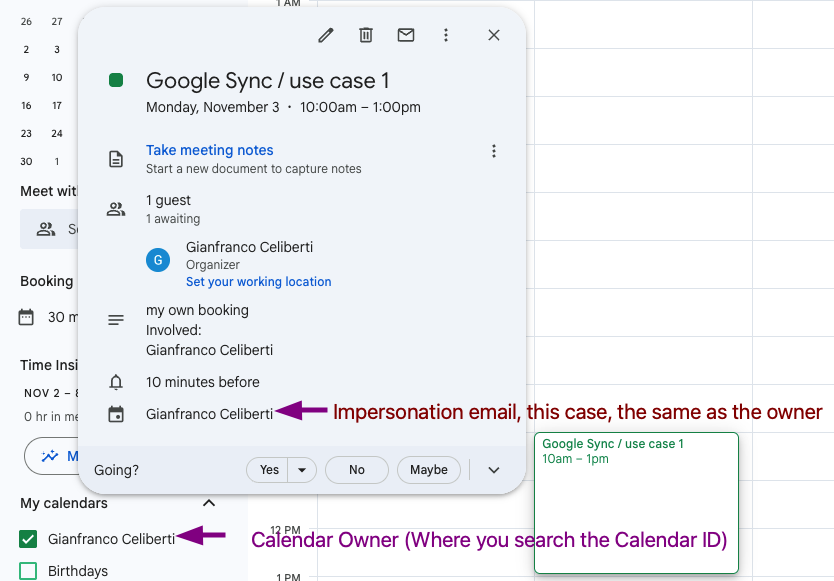
Use Case 1: Syncing a Single User’s Calendar to their own Google Calendar
Each user gets their own dedicated sync rule to ensure only their Bookings and the ones involved appear in their Google account
- Create a Sync Rule per user.
- In the sub menu, click New Rule
- Click on Select button under Provider column : select Google Calendar.
- Event Types: Project Bookings, Task Bookings, Personnel Events (e.g., Sick, Vacation).
- Objects: Select the user (e.g., “Peter”).
- In Settings add the Calendar ID: The ID of the Calendar in Google we want to sync bookings with. (e.g., peter@yourcompany.com).
- Impersonation Email: This will be a real email, In this case this will be the same as the Calendar ID, since it is for personal use.
- The impersonation email is the email address used to authenticate with Google Calendar and manage the events.
- Booking Objects Accept/Decline: Yes/No (Default). If you will use Google Invites, this should be set to yes. See more info below
- Event Status: Busy (Default)/Free. This defines how the events are handled in google and show as busy or free.
- Active checkbox - this should be checked, but can be unchecked to stop syncing bookings on a specific rule

The rule will be in status "Pending" waiting for the sync.
A Booking created in farmerswife, should be synced to the users calendar in google as below.
When a Booking has been successful synced the Sync Status will show “Synced"
You can also look at the "View" button in your rule to see more information on the sync process.

Use Case 2: Syncing a Single Resource’s Calendar
Sync events from multiple users or resources into one shared Google calendar (e.g., a department-wide calendar).
Let’s imagine a company that wants to see the schedules of all editors, all workstations, or all meeting rooms in one shared calendar.
- Create a Sync Rule for multiple users/Resources.
- Add a New Rule
- In the Rule row click on the Provider: select Google Calendar
- Event Types: Project Bookings, Task Bookings.
- Objects: Select the resource you want to sync Bookings for
- Calendar ID: The ID of the Calendar we want to sync bookings with. (e.g., editors@yourcompany.com). This is available from the Google Calendar settings
IMPORTANT: In Google, you will need to Share with ALL the involved users you want to share this calendar with, they will receive an email invitation to add this calendar. - The impersonation email account should be the owner of the shared calendar for this purpose.
- This is the email address used to authenticate with Google Calendar and manage the events.
- Booking Objects Accept/Decline: Yes/No (Default). If you will use Google Invites, this should be set to yes. See more info below
- Event Status: Busy (Default)/Free. This defines how the events are handled in google and show as busy or free.
- Active checkbox - this should be checked, but can be unchecked to stop syncing bookings on a specific rule


This is the view from the shared calendar:
And the view form one Editor in their own Calendars:
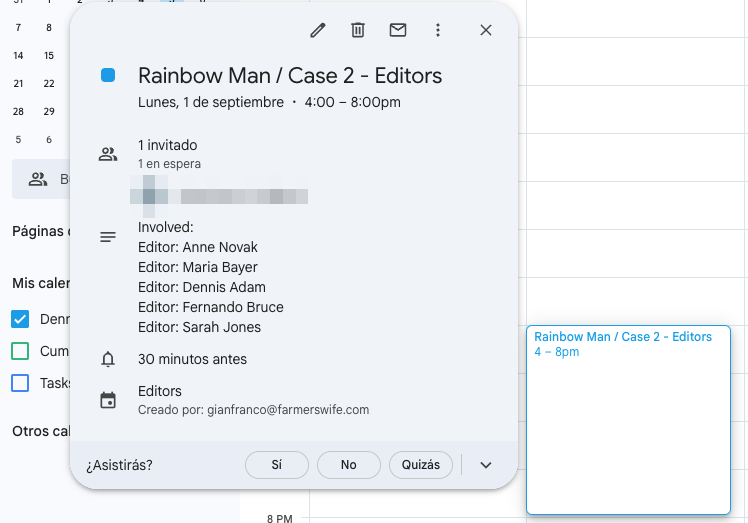
You can also look at the "View" button in your rule to see more information.
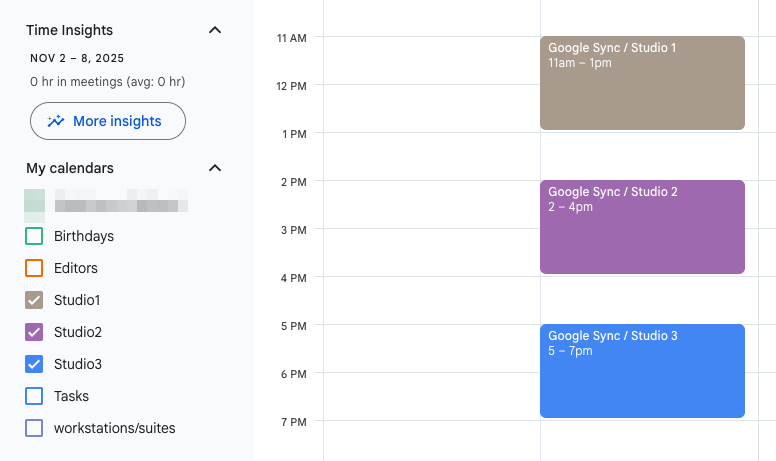
Use Case 3: Sync Multiple Users or Resources (Groups) to a Shared Google Calendar
Sync bookings for a specific resource (e.g., Studio 1, Camera 3, Car 2) into its own Google calendar.
Dedicated resource calendar allows multiple users to check the availability of a room or machine.
- Create a Sync Rule for multiple users/Resources.
- Add a New Rule
- In the Rule row click on the Provider: select Google Calendar
- Event Types: Project Bookings, Task Bookings.
- Objects: Select multiple fw users or resources (Studio1, Studio2, Studio3)
- Calendar ID: The ID of the Calendar we want to sync bookings with. (e.g., studios@yourcompany.com). This is available from the Google Calendar settings
IMPORTANT: In Google, you will need to Share with ALL the involved users you want to share this calendar with, they will receive an email invitation to add this calendar. - The impersonation email account should be the owner of the shared calendar for this purpose.
This is the email address used to authenticate with Google Calendar and manage the events. - Booking Objects Accept/Decline: Yes/No (Default). If you will use Google Invites, this should be set to yes. See more info below
- Event Status: Busy (Default)/Free. This defines how the events are handled in google and show as busy or free.
- Active checkbox - this should be checked, but can be unchecked to stop syncing bookings on a specific rule

For this case we will create 3 separate bookings for all the studios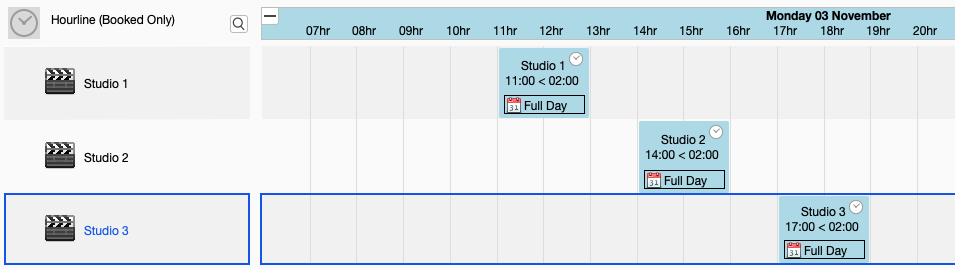
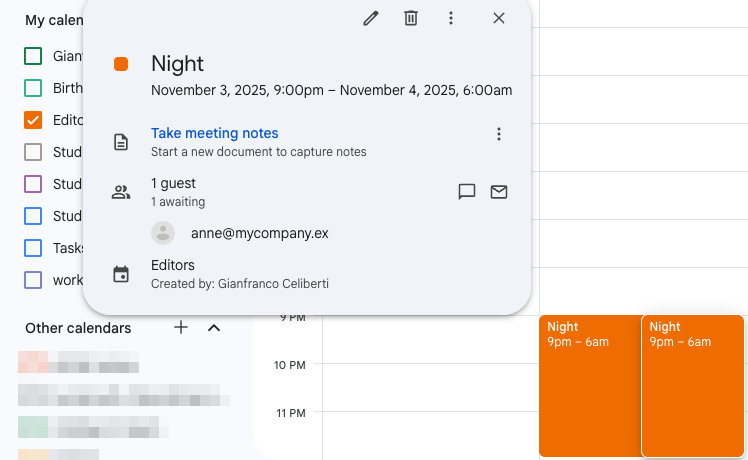
Use Case 4: Syncing events with exclusions.
Sync events from multiple users or resources into a shared Google Calendar, but exclude specific users from syncing certain event types.
Let’s take the same scenario from Use Case 2: a company wants to view all editors schedules in one shared calendar.
In this case, we’ll enhance it by adding an Exclude Rule to prevent a specific user’s events from being synced.
- Follor the same steps as use case 2, we want to create a sync rule for all Editors
- Add a new "Exclude rule"
- In the Exclude Rule row click on the Provider: select Google Calendar
- Event Types: Shifts
- Objects: Select a single user (Dennis Adam)
- Use the same Calendar ID as in the original sync rule.
- Booking Objects Accept/Decline: Yes/No (Default). If you will use Google Invites, this should be set to yes. See more info below
- Event Status: Busy (Default)/Free. This defines how the events are handled in google and show as busy or free.
- Active checkbox - this should be checked, but can be unchecked to stop syncing bookings on a specific rule
For this case, we will create a Shift Booking for 3 users: Anne, Steven, and Dennis.
Expected Result:
The shifts for Anne and Steven will appear in the shared Google Calendar.
The shift for Dennis will be excluded due to the Exclude Rule.
![]()
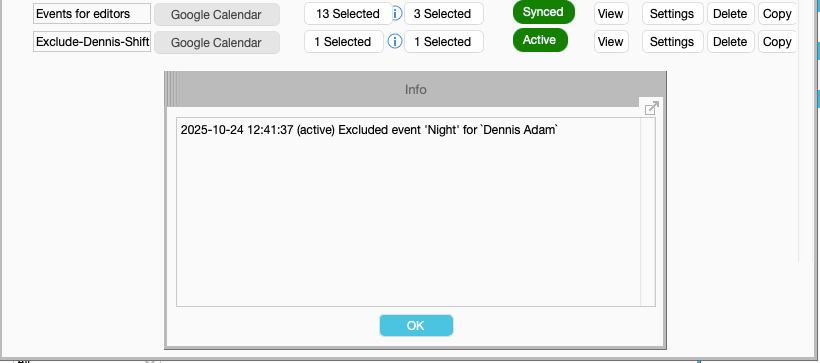
Editors calendar view:
You will only see two events, one for Anne and one for Steven, confirming the exclude rule is working as intended.
You can also verify this by checking the sync logs for the Active rule.
Notify Attendees
This option gives you the option to send an email to the involved users informing about the new event
By Default is always disabled.
To enable this setting, simply click the checkbox inside the rule settings:
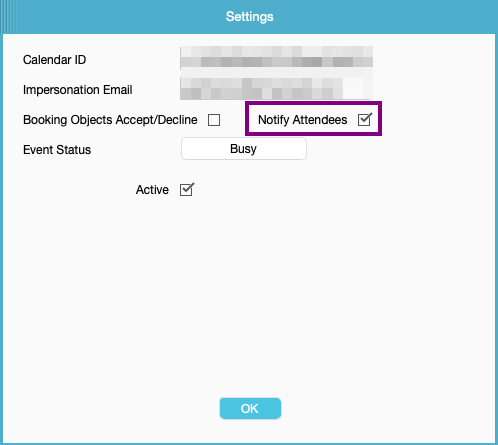
If the setting is disabled, emails will not be sent.
Cancelled Events
Since 7.2 we added support for listening to "Cancelled" Global Status/Sub Status changes to delete events.
A new booking with status Pending User Approval now correctly sends calendar invites to involved users.
Changing a booking’s global status from Confirmed to Cancelled now reflects properly in the calendar and triggers an update.
Deleting a booking in farmerswife via drag and drop results in a cancelled event in the synced calendar.
Checkpoint status change from Planning to Cancelled is also correctly reflected in the synced event.
Google Invite Integration
Optionally enable google invite integration > How to setup
Was this article helpful?
That’s Great!
Thank you for your feedback
Sorry! We couldn't be helpful
Thank you for your feedback
Feedback sent
We appreciate your effort and will try to fix the article