For Google Calendar Sync go here.
This "Calendar Sync" feature allows you to automatically sync farmerswife Bookings to a Outlook Calendar, giving the following advantages.
- Integrating farmerswife schedules with your enterprise scheduling system.
- Sharing calendars for a resources or group of resources with your team or clients who do not have farmerswife access.
- Receiving reminders and notifications directly from Outlook Calendar.
- The Calendar Sync takes place around every 1 minute.
- After the integration is setup, farmerswife will start syncing new events, once the Sync rule is “Active”, previous events are not synced
- The sync is one way only, from farmerswife to Outlook. Any changes made in Outlook Calendar will not be reflected back in Farmerswife.
- 1:1 Relation between Farmerswife Sync Rule and Outlook Calendar.
- A Sync Rule can export multiple farmerswife Objects (users or resources) but only to a single Outlook Calendar ID.
- The following changes in farmerswife will be synced to Outlook Calendar
New Bookings
Retiming a booking
Updating Involved
Changing the global status or checkpoint status of a booking
Deleting a booking in farmerswife will also remove it from Outlook Calendar.
To configure the sync, you need to connect your farmerswife server with your Microsoft Entra configuration, and then specify the Rules for which Bookings to Sync to Outlook Calendar.
The steps are detailed below
- Microsoft Entra and Microsoft Admin platform configuration
- Prerequisites:
- 1. Register the Calendar Sync > Outlook Calendar Application on Microsoft Entra ID
- 2. Configure API Permissions
- 3. Generate and Configure Client Secrets
- 4. Assign Roles to Grant Calendar Access
- 5. Collect and store the required Credentials
- 6. Create a Calendar where farmerswife will send the events (Cases 2 and 3 below)
- Configuring Calendar Sync Rules in farmerswife
- Use Case 1: Syncing a Single User’s Calendar to their own Outlook Calendar
- Use Case 2: Syncing Multiple Users or Resources to a Single Shared Outlook Calendar
- Use Case 3: Syncing a Single Resource’s Calendar (e.g., Room, Equipment, Machine)
- Outlook Calendar Delegated Authorization
Microsoft Entra and Microsoft Admin platform configuration
Prerequisites:
For the new Calendar Sync > Outlook Calendar functionality to work by using the Microsoft Graph API, you need to be able to sign in as a "Super admin" into:
- Microsoft Entra Admin Center: https://entra.microsoft.com/
- Microsoft 365 Admin Center: https://admin.microsoft.com/
1. Register the Calendar Sync > Outlook Calendar Application on Microsoft Entra ID
- Go to Microsoft Entra Admin Center
- Navigate to: Identity > Applications > App registrations.
- Click on: + New Registration.

- Provide the following details:
- Display name: Enter a descriptive name for your app (e.g. "fw-CalendarSync-OutlookCalendar").
- Supported account types: Select Accounts in this organizational directory only (MSFT only - Single tenant).
If you have specific requirements for other account types please contact supportATfarmerswife.com. - Redirect URI: Leave this blank.
- Click Register to create the application.
2. Configure API Permissions
After registration, you will be re-directed to the Application's Overview page.
- Go to the API permissions section on the App registration page.
- Click on: + Add a permission and select in Microsoft APIs > Microsoft Graph.

- Choose Application permissions (this is required for server-to-server communication).
- Search for and add the following permissions:
Calendars.ReadWrite: Read and write calendars in all mailboxes. - Click on Add permissions.
- After adding this permission, click on Grant admin consent for [Your Tenant Name] then use Yes to confirm your action to grant admin consent for the entire Tenant.
- It will look like this

3. Generate and Configure Client Secrets
- Go to the Certificates & secrets section on the App registration page.
- Then go to the Client secrets section and click on + New client secret.

- Provide a description (e.g., "fw CalendarSync Secret") and set an expiration period (e.g. 12 months or 24 months) and click on Add.
- Copy the Value of the new Client Secret immediately and save it securely; you need this on fw Client app side and you will not be able to view it again after closing your Entra session!
4. Assign Roles to Grant Calendar Access
To allow a "Service Account" (user or resource) to manage calendars across your organization you need to ensure it has the appropriate access to calendars.
Go to the Microsoft 365 Admin Center
- Navigate to Users > Active Users > you now have these options:
- Small setup: Create a sync rule per user.
- Large Setup: Create a "Service Account" e.g. “fwOutlookCalendar” user with a license and with Role: Application Administrator

Ensure that the Service Account has the necessary Directory Roles (e.g. Application Administrator) assigned to allow proper access.
5. Collect and store the required Credentials
Return to the Overview page of the application registration.
Copy and save the following details together with the Client Secret Value from the previous step:
- Application (Client) ID
- Directory (Tenant) ID
- Client Secret
- Calendar Owner Email*
*This refers to the email address associated with the user or resource that “owns” the calendar.

6. Create a Calendar where farmerswife will send the events (Cases 2 and 3 below)
If you want to sync Resource bookings, or multiple users Bookings to a shared calendar in Outlook, you will need to add a calendar (this is not needed for Use Case 1)
- On Outlook Calendar web use "Add Calendar" > "Add from directory" > Select an account > Select person, group or resource from your organization's directory to view associated calendar.
- Select where to add to

Configuring Calendar Sync Rules in farmerswife
Please use the following steps to start using this new Feature.
1. Enable the Sync in farmerswife Toolbox
In the farmerswife Desktop app, go to Toolbox> Settings > Server Setup > Check " Enable Calendar Sync" box.
If the checkbox is not available, try restarting your desktop client.
Scroll down to "Calendar Sync: Setup"
A new window will open "Calendar Sync Settings”.
2. Set up the Sync Rules in the Toolbox
In the "Calendar Sync Settings”, Rules are added from the submenu on the top left

There are a number of options on Rule Types
- New Rule:
This option allows you to define specific Users and Resources you want to sync events for.
- New Rule (Users & Resources):
This option is designed for syncing All Users and Resources.
- New Exclude Rule:
This rule allows to create an exclusion rule for specific Objects or Event types, preventing them from being synced to the calendar.
e.g you could have a Rule all Users & Resources, and you could add an exclude rule for Shift Bookings, so then all bookings for all users and resources would be synced except Shift Bookings.
Rule List
When you have rules created they appear in a list where you can see the details, events sync status, deactivate and copy.

Use Case 1: Syncing a Single User’s Calendar to their own Outlook Calendar
Each user gets their own dedicated sync rule to ensure only their Bookings and the ones involved appear in their Microsoft account
- Create a Sync Rule per user.
- In the sub menu, click New Rule
- Click on Select button under Provider column : select Outlook Calendar.
- Event Types: Project Bookings, Task Bookings, Personnel Events (e.g., Sick, Vacation).
- Objects: Select the user (e.g., “Peter”).
- In Settings add the Tenant ID, Client ID and Client Secret that you previously saved in step 5
- Calendar Owner Email: This refers to the email address associated with the user or resource that “owns” the calendar.
- Booking Objects Accept/Decline: Yes/No (Default).
- Event Status: Busy (Default)/Free. This defines how the events are handled in Outlook and show as busy or free.
- Active checkbox - this should be checked, but can be unchecked to stop syncing bookings on a specific rule

The rule will be in status "Pending" waiting for the sync.
A Booking created in farmerswife, should be synced to the users calendar in Outlook as below.
When a Booking has been successful synced the Sync Status will show “Synced"


You can also look at the "View" button in your rule to see more information on the sync process.

Use Case 2: Syncing Multiple Users or Resources to a Single Shared Outlook Calendar
Sync events from multiple users or resources into one shared Outlook calendar (e.g., a department-wide calendar).
Let’s imagine a company that wants to see the schedules of all editors, all workstations, or all meeting rooms in one shared calendar.
- Create a Sync Rule for multiple users/resources.
- In the Rule row click on the Provider: select Outlook Calendar
- Objects: Select the resource you want to sync Bookings for
- Event Types: Project Bookings, Task Bookings.
- Calendar Owner Email: The email of the shared Outlook calendar (e.g. editors@yourcompany.com, studios@yourcompany.com, postproduction@yourcompany.com).

Outcome: All selected Objects’ events are visible in one shared Outlook calendar.


Use Case 3: Syncing a Single Resource’s Calendar (e.g., Room, Equipment, Machine)
Sync bookings for a specific resource (e.g., Studio 1, Camera 3, Car 2) into its own Outlook calendar.
Dedicated resource calendar allows multiple users to check the availability of a room or machine.
- Create a Sync Rule per resource.
- Provider: Outlook Calendar
- Objects: Select multiple fw users or resources (Studio1)
- Event Types: Project Bookings, Task Bookings.
- Calendar Owner Email: Assign a dedicated Outlook resource calendar (e.g., studio1@yourcompany.com).

Outcome: Users can subscribe to this Outlook resource calendar to see its availability.

Calendar Sync > Outlook Calendar new support for "Delegated Authorization"
A new option has been added in 7.3 Beta 11 for Calendar Sync > Outlook Calendar to support Delegated Authorization.
This allows users to authorize farmerswife to access and update their Outlook Calendars through a secure OAuth2 "Delegated flow".
Ensure the App Registration is using this "Microsoft Graph > API Permission" configuration:
Delegated:
- Calendars.ReadWrite
- User.Read (listed by default)
Steps:
- In fw Client app > Toolbox > Settings > Server Setup > Calendar Sync > Setup > Create a new Calendar Rule > Provider > select "Outlook Calendar".
- Go to the rule's "Settings" and enable the "Use Delegated Authorization" check-box.
- Click the button "Select User"
- Complete these fields with you information from Microsoft Entra:
- Tenant ID
- Client ID
- Client Secret
- Calendar Owner Email
- Redirect URl as configured on MS Entra admin center > App registrations > your app > Authentication > Web Redirect URIs in this format: https://YourTenantName:ApiPort/oidc/callback - Click "OK" and re-open the rule.
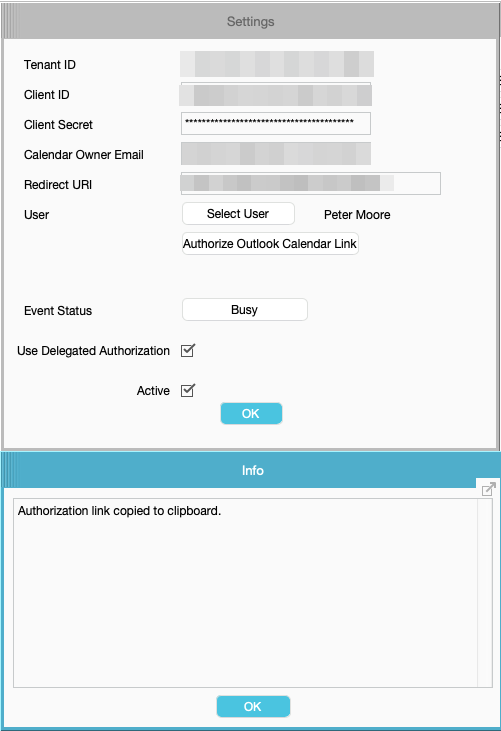
- Click on the "Authorize Outlook Calendar Link"
- A new window will appear confirming that the link was copied to your clipboard.
- Paste the url in your browser > "Permissions requested" from Microsoft will appear.

- After successfully completing the OAuth flow you will see a window like this:

- Restart fw and check the Sync Rule, inspect it and now you will see an Access Token information.
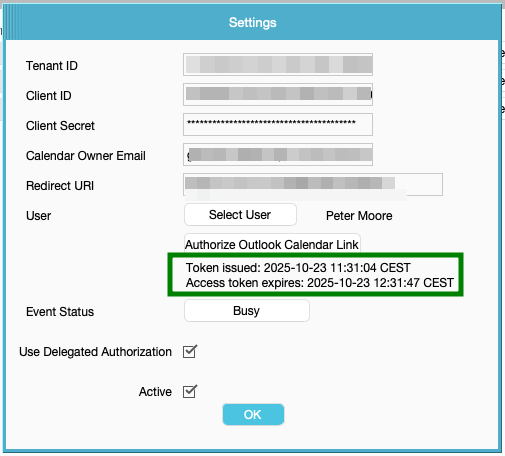
- The Rule is ready to use.
Delegated access tokens usually expire after about an hour.
Once expired, create a new event for that user and farmerswife will refresh the token automatically and update the expiration time.
Was this article helpful?
That’s Great!
Thank you for your feedback
Sorry! We couldn't be helpful
Thank you for your feedback
Feedback sent
We appreciate your effort and will try to fix the article