Last updated: 19. May 2024
This article will detail the requirements and information needed to integrate the farmerswife (fw) Server app with "Microsoft Entra ID Connector" Single Sign On (SSO) conditional access with Multi Factor Authentication (MFA) by using "OpenID Connect".
NOTE: These instructions are created by using a basic Entra ID configuration. Do not use any of the example information. It's possible that in addition to these steps, there are other policies, etc. you might need to create or modify.
Requirements:
- To use the farmerswife (fw) Server-side "Entra ID Connector" and "OpenID Connect" integration does not need to be licensed. We kindly request to inform us of using it if you are self-hosting your farmerswife system. This will help us on supporting you using this integration.
- In order for the "Entra ID Connector" to work with "OpenID Connect", your farmerswife system needs to be running on v7.1 (7.1.1000-0- released 28th of August 2024) and later.
- The fw Server app must be configured to use the optional "server.cfg" (more info here) and use in HTTP_HOME https://dowmainname) and the field in farmerswife Server app > Setup > General > Url To Server must contain the info of the qualified domain name.
Creating the "Microsoft Graph > Application" integration on Entra ID
On EntraID create a new App Registration and gather the information needed for the EntraID and OpenID Connectors configuration within the fw Server app.
Additionally you will need a user Group per each farmerswife Permission Profile and Web Permission Profile and the Group Name / Object ID of those Groups from EntraID.
In our experience it is best to first create the app, add the needed API Permissions and as the final step add a new Client Secret Key to the freshly created app on EntraID.
Summary of needed info from EntraID to be used on fw Server side
| From Entra ID | fw Server app > Setup > Users > MS Entra ID Connector |
| Group Name(s) | User Groups > Entra ID Group Name |
| Group Object ID(s) | User Groups > Entra ID Object ID |
| From Entra ID > App registrations | fw Server > Setup > User > OpenID Connect |
| Application ID: | Client ID: |
| Client Secret Value | Secret Key: |
| OAuth 2.0 authorization endpoint (v2) | Auth URL: |
| OAuth 2.0 token endpoint (v2) | Token URL: |
| Directory (tenant) ID | Userinfo URL: https://graph.microsoft.com/oidc/userinfo |
| - | Scope: openid profile email offline_access |
| Application ID: | Audience: |
| (App > Web Redirect URIs) | Local Target: "externalURL:ApiPort" |
Step 1) Create a new app on Entra ID
Sign into: https://entra.microsoft.com/
Then go to Applications > App registrations and here create a new App.
Give it a Name.
Set the Redirect URI to Web.
And click on Register. 
Step 2) Retrieve the info of the Application (Client) ID and Directory (tenant) ID:

And retrieve the OAuth 2.0 authorization endpoint (v2), OAuth 2.0 token endpoint (v2) under Endpoints:
 Step 3) Add the needed API Permissions
On your freshly created app go to API permissions. Click on "+ Add a permission" select Microsoft Graph and add these 7 Permissions:
| Application | Delegated |
| Application.Read.All | Group.Read.All |
| Directory.Read.All | User.Read |
| Policy.Read.All | User.Read.All |
| User.ReadBasic.All |
Update 27-Nov-2024:
The previously listed "Domain.ReadWrite.All" is not required and now removed from being needed; signing-in still works as before.

To apply the selected API permission, you need to use the "Grant admin consent for MSFT" button (see above screen shot) to finish the API Permissions part, which will then look like this:

Step 4) Create a new Client Secret
On your freshly created app go to Certificates & secrets. Click on "+ New client secret" set a Description and choose when it Expires.
NOTE: Since v7.2 it is possible to update the client possible to update the Client Secret Value from the e fw Client desktop app in Toolbox > Settings > Server Setup > Microsoft Entra ID Connector > "Setup" button > "Update Secret Key" button. This is very helpful when you have to work with Client Secrets which expire frequently.
From the new Client Secret Key save the Client Secret Value - you are only able to access this value on creation so be sure to copy it. Otherwise you need to create a new one:
Step 5) Work with Groups on Entra ID to ensure the synced users have the correct farmerswife Permissions applied.
Within Entra ID - access (or create) any relevant Groups for farmerswife users.
Groups are used to be able to map different farmerswife Permission or Web Permission Profiles to specific groups of users. On the "Sync" with farmerswife these users are then either created or modified to either become a Advanced User or Web User and to then have the correct Permission or Web Permission Profile assigned to their user in farmerswife.
See also the below info on how to configure the Groups on farmerswife.
Make a note of the and Group Name(s) and Group Object ID(s) to be used for farmerswife.
Step 6) Configure the Web Redirect URIs
Within Entra ID App registrations > your app > Authentication configure the Web Redirect URIs

The above marked field "Web Redirect URIs" needs to contain the counter part info of the "Local Target" field on the fw Server app-side, in this format:
https://fw-server-app-URL:ApiPort/oidc/callback
You need to change this according to your environment.
If your system is farmerswife cloud hosted, you will receive the needed Web Redirect URIs info from us.
Use the "Save" button to finish creating the "App registration" on Entra ID.
Configuring the farmerswife Server app:
The following info is needed for self-hosted farmerswife systems and parts of it for fw-cloud hosted farmerswife system.
If your system is cloud-hosted by farmerswife, you need to follow the above steps on Entra ID, and then provide the information marked below in yellow to your farmerswife Product Specialist, for this info to be populated on your system and to then schedule a remote session to verify the setup and test the sign-in.
VERY IMPORTANT: you MUST use the EXACT info as in the provided examples.
Involved farmerswife-side settings areas:
- fw Server app > Setup > Users > Microsoft Entra ID Connector
- fw Server / fw Client app > Modify User window > Microsoft Entra ID Connector
- fw Client app > Toolbox > Settings > Server Setup > Microsoft Entra ID Connector
Go to the running farmerswife Server app > Setup > Users tab. There are two areas which require configuration:
Step 1) The "Microsoft Entra ID Connector:" area Enabled: No (by default), change to Yes to configure.
Use OpenID Connect: No (by default), change to Yes to use EntraID with OpenID Connect.
User Groups:
Create here the needed Groups to map the fw Permission Profiles and Web Permission Profiles needed when users get "synced" (created & updated) from Entra ID.
These can also be maintained from the fw Client desktop app, see info further below.
Entra ID Group Name: The Group name on Entra ID.
Entra ID Object ID: The Object ID of that Group on Entra ID.
User License Type: The farmerswife User License Type "Advanced User" or "Web User" to be used for this Group.
Permission Profile: The farmerswife Permission Profile or Web Permission Profile to be used for this Group.
Division (if licensed): The farmerswife Division the members of this Group will belong to.
User Category: Set here one of the three available User Category options.
IMPORTANT NOTE:
The list of Groups supports a "hierarchal" structure in descending order! This is needed to support "Groups inside of Groups".
The Group with the "highest Permission level" must get created 1st; and then the following Groups, which still need to be created in the correct order.
Strip Domain Name From Username When Creating: On EntraID the Usernames are Email Addresses!
This is a legacy Feature from the oldest version of this Integration for "MS Active Directory". Back then it's main purpose was to make it easier for the end-user to only have to enter their "UserPrincipalName", without also having to enter the full domain name to authenticate.
This is still supported and works, but with conditional access enabled via OpenID, it's not possible to authenticate against EntraID without using the complete UserPrincipalName with Domain Name.
It is now potentially useful, to see only the shorter UserPrincipalName of users within farmerswife.
MS Entra ID Extension Attribute ID to Import User Number: This is a setting for a specific custom work-flow.
It is used to map a certain Entra ID Extension Attribute ID to then populate or import the value into the "Number" field on the Modify User window in farmerswife.
"Test:" button gets used once you're done with the configuration, to test the Entra ID Connector config, which should then return this message "Windows Entra ID Successfully Tested" if everything is correctly configured:
IMPORTANT NOTE:
If there are any issues, a different pop-up window will appear, which will contain the error info returned from Entra ID (if there is any). Carefully review this info, as it typically contains the information to what is wrong, and will help to resolve the issue(s).
"Sync Now:" button is used to manually trigger a sync of all users as per the added and configured user Groups on EntraID AND your farmerswife Server.
On this example "Sync Now" result pop-up window here:
You see, that during the "sync process" with Entra ID the above 3 users were created.
These 3 users all belong to the same Group on Entra ID called "fw-admin".
Added since 7.2 RC1:
Entra ID Connector - configure Custom User / Security Attributes
Since v7.2 RC1 farmerswife (fw) supports to map and populate specific user attributes from Microsoft Graph API for synced users:
- Standard string attributes: birthday, city, companyName, etc.
- Manager (object: manager.displayName) → can be mapped to a fw Object Custom Field (e.g. Manager)
- Custom Security Attributes > Defined in Microsoft Entra under Protection > Custom Security Attributes.

- On EntraID only administrators with the roles:
- Attribute Definition Administrator
- Attribute Assignment Administrator
- can manage them.
- You must:
- Create an Attribute Set.
- Add custom attributes (types: string, boolean, integer).
- Assign values to users under their profile.
- In the Custom Fields Mappings section:
| MS Entra ID Field Name | Farmerswife Custom Field |- For Custom Security Attributes:
- Use this format in the left column:
- customSecurityAttributes.<AttributeSet>.<AttributeName>
- Only Custom Fields type Text and type Entry are currently supported.


Step 2) The "OpenID Connect:" area
Go to your running fw Server app > Setup > General > Users tab > "OpenID Connect" section to populate these fields as per this example:
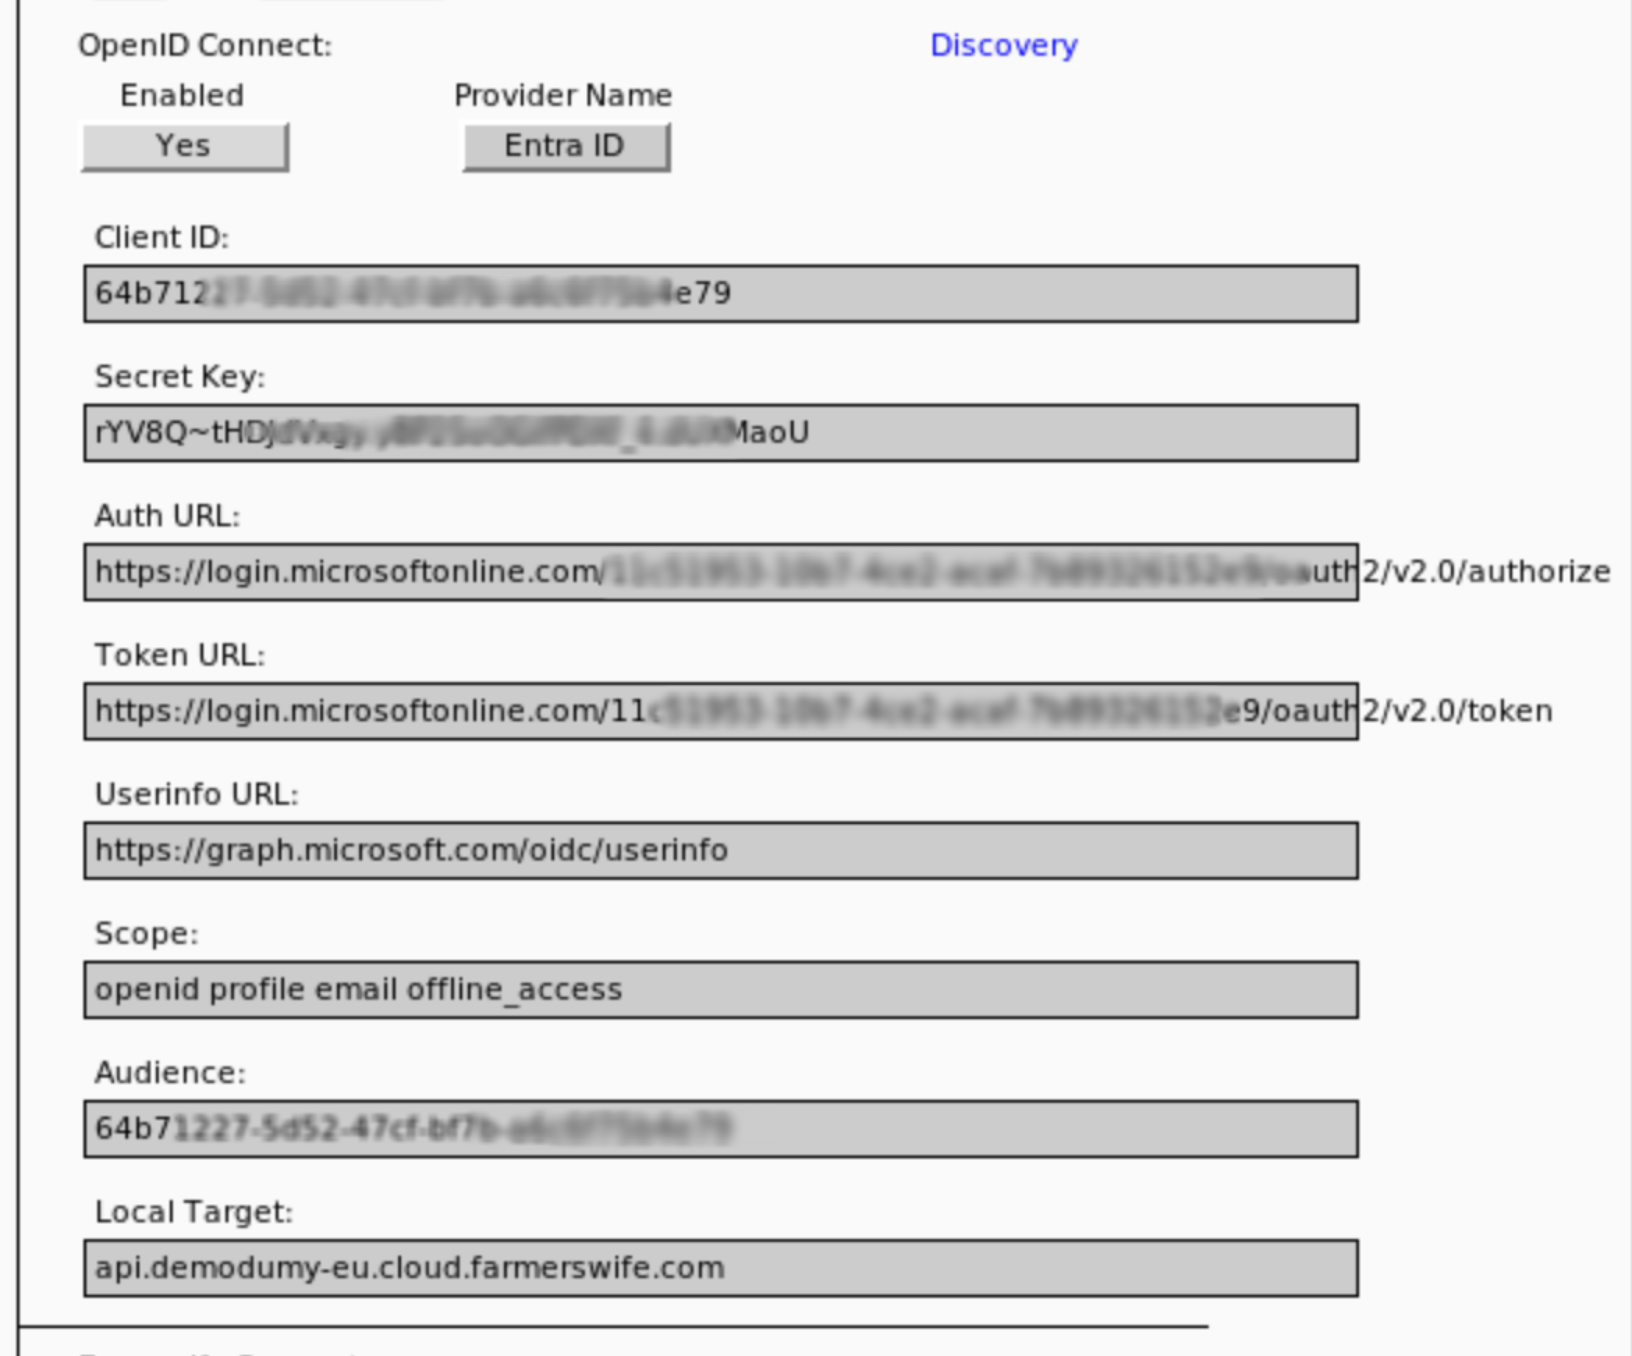
Enabled: "No" (default) / Set to "Yes" to enable this integration.
Provider Name: This is empty by default. The current options are:
- OpenID
- Entra ID
- Okta
Use here "Entra ID". This will then be displayed on the fw Client desktop app's Login window, the Web Clients Login page and the Mobile Web Clients Login page, where this button then opens the EntraID's sign-in web page, see the images below in the "Onboarding Entra ID users into farmerswife" section.
Client ID: Provided by Entra ID when a new "Integration App" gets created as per the above info.
Secret Key: Provided by Entra ID when a new "Integration App" gets created as per the above info.
Auth URL: Provided by Entra ID from the new created "Integration App" within the "Endpoints" tab in this format:
https://login.microsoftonline.com/yourApps-DirectoryTenantID/oauth2/v2.0/authorize
Token URL: Provided by Entra ID from the new created "Integration App" within the "Endpoints" tab in this format:
https://login.microsoftonline.com/yourApps-DirectoryTenantID/oauth2/v2.0/token
Userinfo URL: Keep this exact string in this field:
https://graph.microsoft.com/oidc/userinfo
Scope: Keep this exact string in this field:
openid offline_access profile email
Audience: Add here the same info as on above "Client ID".
Local Target: Enter here this info: "externalURL:ApiPort" or if an additional sub-domain is configured to ensure HTTPS via Port 443 traffic routing; e.g.:
demodummy-eu.cloud.farmerswife.com:25000
api.demodummy-eu.cloud.farmerswife.com
Optional Setting: "Only Show "Login With External Provider" Button":
This new setting in fw Server > Setup > Users in the bottom right hand side called "Only Show "Login With External Provider" Button" is by default disabled, set to "No".

Once this is set to Yes, then this will hide the farmerswife Username and Password fields and the "Login" button from the Login windows / pages of the fw Client desktop app, the Web Client and the Mobile Web Client. The aim of this setting is that the end-user will only see the "Login With External Provider" button, which will then show the info of the 3 above mentioned options for "External Provider".
This is then also supported on the iOS fw app. See the below images in the following chapter.
Onboarding Entra ID users into farmerswife
Use the fw Client desktop app as an Advanced User with Permission to access "Server Setup".
Go to fw Client app > Toolbox > Settings > Server Setup > "Microsoft Entra ID Connector" to "manage" this integration:

Sync Time: Set here the time for the Entra ID connector to automatically trigger the user "Sync".
The user sync process is a threaded background process; but it is very strong and can have an impact on performance while it's active.
When setting the interval, ensure you know how long the sync will take, because you need to ensure it will not overlap. The more Groups and users need to be synced / maintained the longer the sync will take. Some systems sync only Every 24h.
Best practice recommendation is to use Sync Time: Every 60 Minutes.
Setup ...
Update Secret Key (since v7.1):
This is used on integrations with Entra ID, where the App registration's "Secret Key" policies require this to expire.
First use the "Test" button to ensure the current key is expired.
Now use the "Update Secret Key" button to here apply the new "Secret Key".
Then use again the "Test" button to ensure the updated key is working.
Optional: Use the "Sync Now" button to ensure the synced users are up to date; be aware how long a sync will take.
User Groups:
Create and maintain here the needed Groups to map the fw Permission Profiles and Web Permission Profiles needed when users get "synced" (created & updated) from Entra ID.
Use the green "+" icon to create more Groups.
Click on existing Groups to reach the detailed configuration as explained above.
Test:
This button gets used once you're done with the configuration, to test the Entra ID Connector config, which should then return this message "Windows Entra ID Successfully Tested" if everything is correctly configured.
Sync Now: This button is used to manually trigger a sync of all users as per the added and configured user Groups on EntraID AND your farmerswife Server.
On the created / synced user(s) - Things to note on the Modify User window:
The Username in farmerswife IS the EntraID sign-in Name including the domain info.
NOTE: This can be disabled so that it's username-only if desired, see above setting Strip Domain Name From Username When Creating).
The fields "Username", "Password" and "Email" are "blocked" on synced users from EntraID; note the white-ish background color on those fields:

These 3 blocked fields can't be changed as long as on the "Microsoft Entra ID Connector" setting is set to one of the three "Enabled" options:

IMPORTANT:
If you are starting to use the EntraID Connector with already existing users on your farmerswife system, then you first need to ensure, that the fields Username and Email match with the UserPrincipalName on EntraID.
Only if this is correctly configured change the "Microsoft Entra ID Connector" setting to one of the "Enabled" options.
If this configration does not match, then the Entra ID sync will not "recognise" the existing user in farmerswife as a valid one, and it will create a new one and de-activate the "wrong one.
The option Enabled: Authenticate, Sync Profile and Possible Properties and the User License Type and Permission Profile match with what was configured on EntraID Connector > User Group window.
VERY IMPORTANT:
For the "External Provider" button to show on the fw Client desktop app's Login window, click on "Setup" icon and on the configured "Servers" connection's "Edit Server" window and ensure the "Get Server Info:" check-box is ticked/enabled!.

For any user who has "Microsoft Entra ID Connector > Enabled" always keep the "Username" and "Password" fields empty!
Always use the "Login with Entra ID" button!
Access via fw Client desktop app on macOS and Windows
| Default | "Only Show "Login With External Provider" Button" = Yes |
 |  |
Login With Entra ID via the iOS fw app
On your iOS device go to Settings > farmerswife and here ONLY configure the "SERVER" connection details using Address and Port (the API Port value)
Keep the "Username" and "Password" fields empty!: When you then launch the iOS fw app use the "Login with Entra ID" option:
 You then need to authenticate against Entra ID by entering your credentials and the MFA step as configured on Entra ID:

On the re-direction from the Entra ID sign-in process use "Open" on the successful login:

To then be logged into farmerswife:

Login With Entra ID via the Web Client
Keep the "Username" and "Password" fields empty and use the "Login with Entra ID" button:
Login With Entra ID via the Mobile Web Client
Keep the "Username" and "Password" fields empty and use the "Login with Entra ID" button: Example 1st time Entra ID sign-in page and re-direct to the farmerswife system with the Web Client


Was this article helpful?
That’s Great!
Thank you for your feedback
Sorry! We couldn't be helpful
Thank you for your feedback
Feedback sent
We appreciate your effort and will try to fix the article