The Timeline, enables the display of both objects and projects, PDF printing of the schedule, drag and drop expansion of bookings, linear visualization of project timelines with binders and sub-binders and much more.
- Activate the new Timeline
- View options for the Timeline
- Adding Items to Timeline and Second Window
- View Projects in Objects Tree
- Settings
- Scheduling in the Timeline
Enable Timeline
To be able to use this new feature go to Toolbox > Timeline tab, and untick the option "Classic Mode".
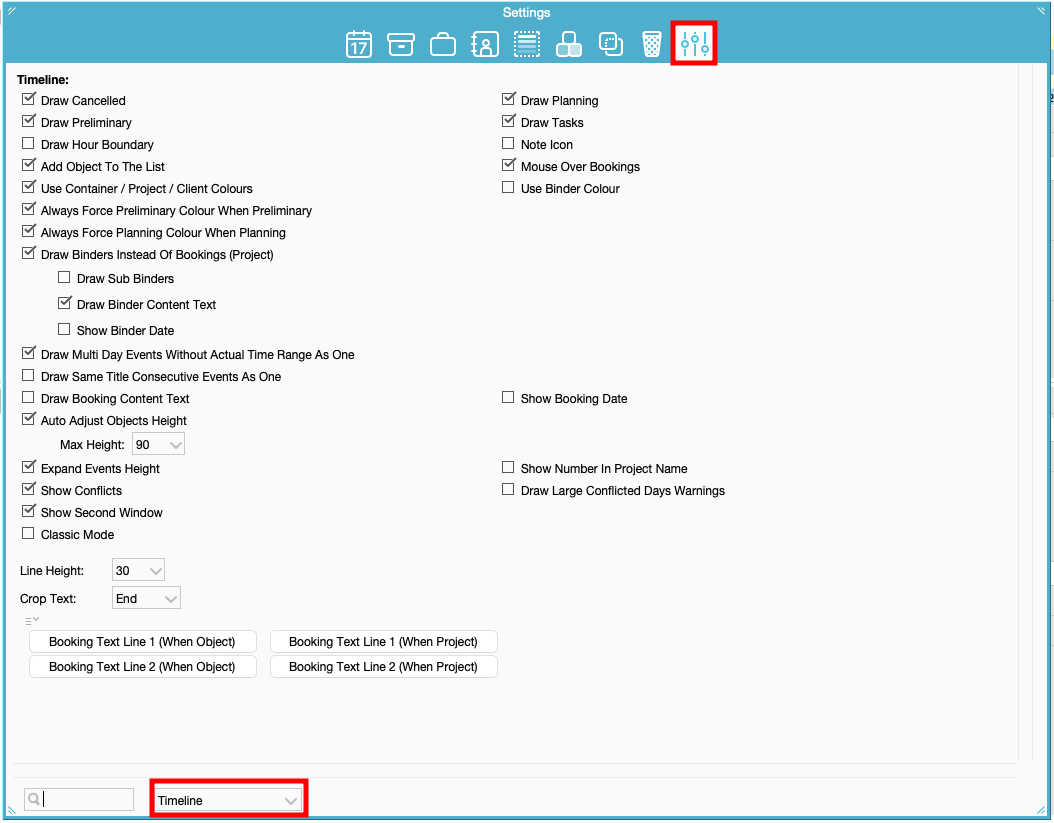
View options for the Timeline
Show events
- Draw Cancelled: show Bookings with Cancelled Substatus
- Draw Planning: show Bookings with Planning Substatus
- Draw Preliminary: show Bookings with Preliminary Substatus
- Draw Tasks: show Task Bookings
- Draw Hour Boundary: display Bookings as small rectangles aligned with the time of day they occur. If unchecked, Bookings will be stacked on top of each other, occupying the entire day's cell space.
Show details
- Note Icon: Displays the Booking Note in the Longform and the Object Note through the Note icon. If the setting: Draw Hour Boundary is used, the Note Icon will only be displayed if there is enough space.
- Add Object To The List: When selecting the Object in Toolbox > Objects tab > Add To Tree the Object will be added below all the other Objects in the Objects Tree.
- Mouse Over Bookings: Will show the Mouse Over when hovering over a booking.
Colour coding
- Use Container/Project/Client Colors: Will show any of these colors, if there are set and overwrite the Booking Status colors.
- Always Force Preliminary Colour When Preliminary: Will overwrite all other colors and show the color that is selected for Preliminary in Toolbox > settings tab > Display.
- Always Force Planning Colour When Planning: Will overwrite all other colors and show the color that is selected for Planning in Toolbox > settings tab > Display.
Project display
- Draw Binders Instead of Bookings: Displays project binders in the timeline instead of individual bookings.
- Draw Sub Binders: When enabled, sub binders are also displayed within the main binder structure.
- Draw Binder Content Text: Shows the binder content text directly on the binder blocks in the timeline.
- Show Binder Date: Displays the binder date on the binder blocks for additional context.
Events display
- Draw Multi Day Events Without Actual Time Range As One: Only works if "Draw Hour Boundary" is set. It will show multiple day Bookings as one, even if they don't go through the night and have: "Use Actual Time Range" set.
- Draw Same Projects Consecutive Events As One: If you have an Object with single-day Bookings for the same Project on consecutive days, click this setting to display the Project name across all the days.
 Auto Adjust Objects Height: If ticked, the Objects line height will extend to make room for the stacked Bookings. If not ticked, the Booking rectangles will adjust themselves to the line height given.
- Break Event On Days With Multiple Events To See More Text: This setting is only available, if the checkbox "Auto Adjust Objects Height" is not selected. With this new setting it will be possible to see more text of overlapping Bookings, so it
displays it similar to the Classic Mode. - Expand Events Height: Will expand the Booking height to occupy the entire height of the Object line. Useful if e.g. on some days you have 2 Bookings that are stacked on top of each other and on other days you have only 1 Booking, this Booking height will then be increased to meet the Object line height of the two Bookings.

- Show Number In Project Name: Will add the Project's Number in () after the Project Name.
- Show Conflicts: Option to show or hide any conflicts on Booking. If ticked "Draw Large Conflicted Days Warning" is accessible to be ticked as well.
- Draw Large Conflicted Days Warnings: When enabled will show the conflicted days with larger red rectangles instead of small lines at the bottom.
- Small...
... and large conflict:

- Draw Division Icon In Object Tree: If the Division module is licensed it will draw the Division icon on the Booking.
- Line Height: Set a default line height which only applies to the Object Tree.
- Crop Text: If there not enough space on the Booking to display the selected text, FW can crop the text from Start, Middle or End of the text value. The default of this setting is to crop from the End.
Booking Text Configuration
You can configure which information is displayed on up to two text lines inside booking blocks.
- Booking Text Line 1 (When Object): Let's you choose what text to display on the first text line when Objects are selected in the Tree.
- Booking Text Line 2 (When Object): Let's you choose what text to display on the second text line when Objects are selected in the Tree.
- Available options:
Binder Name
Booking Name
Client Name
Project Name
Container Name
- If you choose multiple values, they will be separated by a '/'. Example: Booking Name / Project Name
- Booking Text Line 1 (When Project): Let's you choose what text to display on the first text line when Projects are selected in the Tree.
- Booking Text Line 2 (When Project): Let's you choose what text to display on the second text line when Projects are selected in the Tree.
- Available options:
Binder Name
Booking Name
Client Name
Project Name
- If you choose multiple values, they will be separated by a '/'. Example: Booking Name / Binder Name
Text lines are displayed only if there is enough vertical space in the booking timeline.
If there is insufficient space, the second line (or both lines) will not be shown, even if configured.
Focus is now set on the Booking that the mouse is hovering over, double click or single click will open the Booking.
Objects Tree Menu > View Mode > will only show: Verified and Verified/Checked Out. Will also show those colors in the new Object Tree.
Maintenance Bookings will show with the maintenance icon and a bright green striped color.

If the EMT module is licensed there are a few more options to explore in the Object Tree see here.
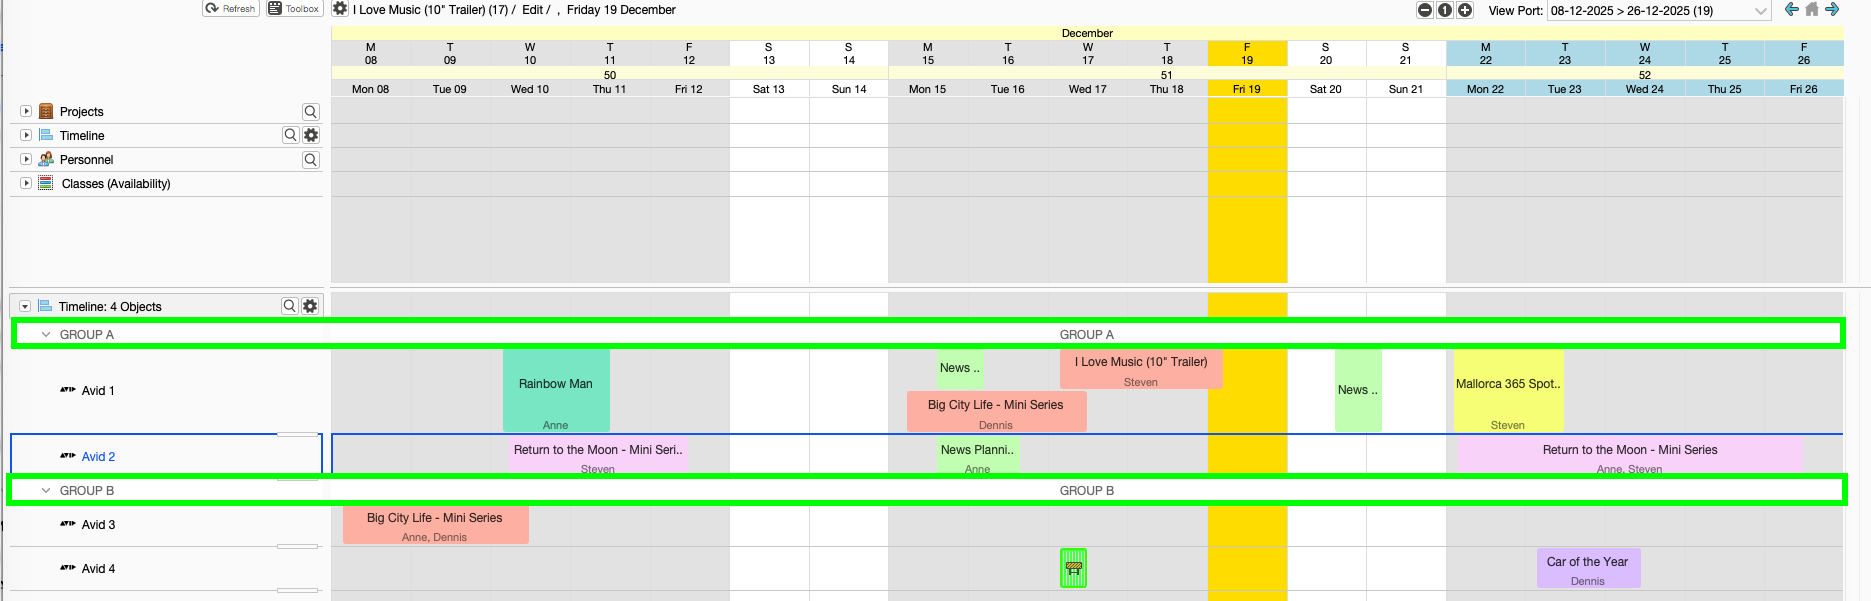
Second window
A new setting Show Second Window is available in the Toolbox for the objects tree.
When enabled, it adds a second Timeline view at the bottom of the Long Form view.
This additional panel allows you to browse, manage, and drag objects or resources independently from the main timeline at the top. It is especially useful when working with large schedules, as it enables a more productive and flexible workflow by keeping two different Timeline contexts visible at the same time.
Adding Items to Timeline and Second Window
- Drag and drop Objects from the Toolbox > Objects tab.
- Or click the magnifying glass button to add items to the tree. This opens the Object Chooser, allowing you to multi-select and load Objects, Object Classes, or Projects into the tree.
- Hold Shift and click if you want to reset the list and replace with an only unique object.
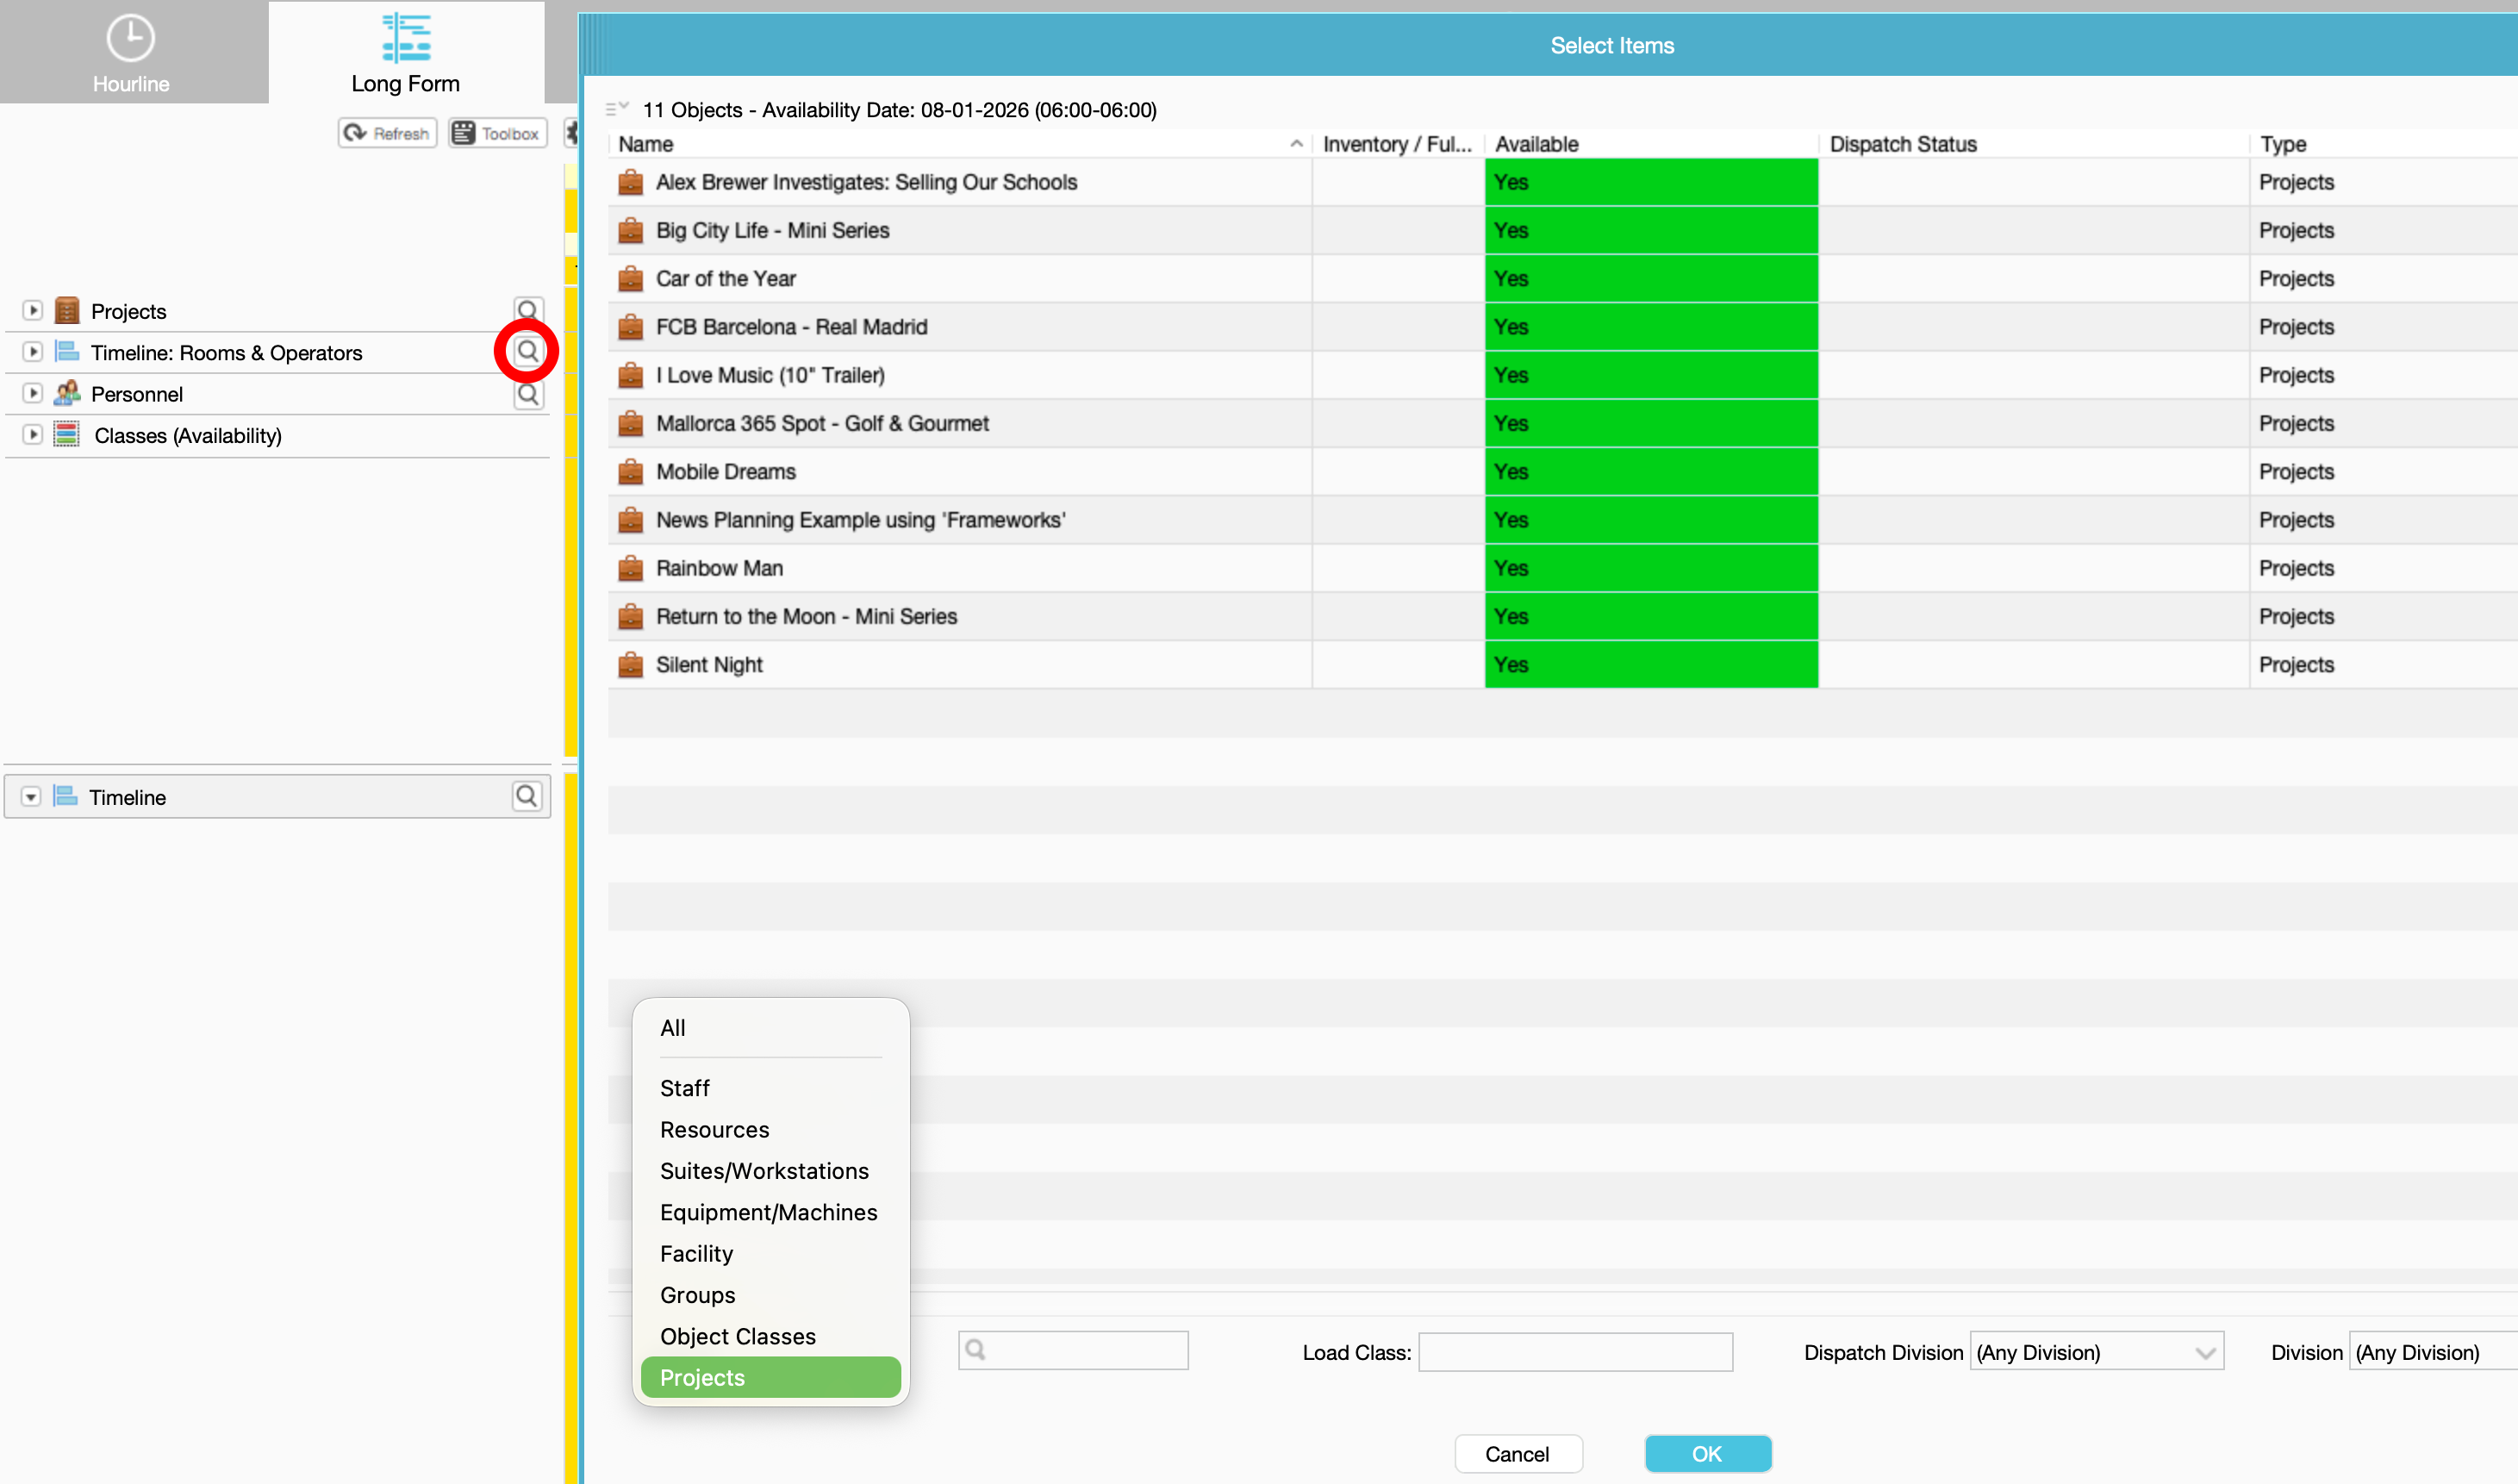
- When selecting Object Classes, these will appear as expandable groups, displayed inside a drop-down selector as shown in the screenshot. Each class can be expanded to reveal and work with its members.

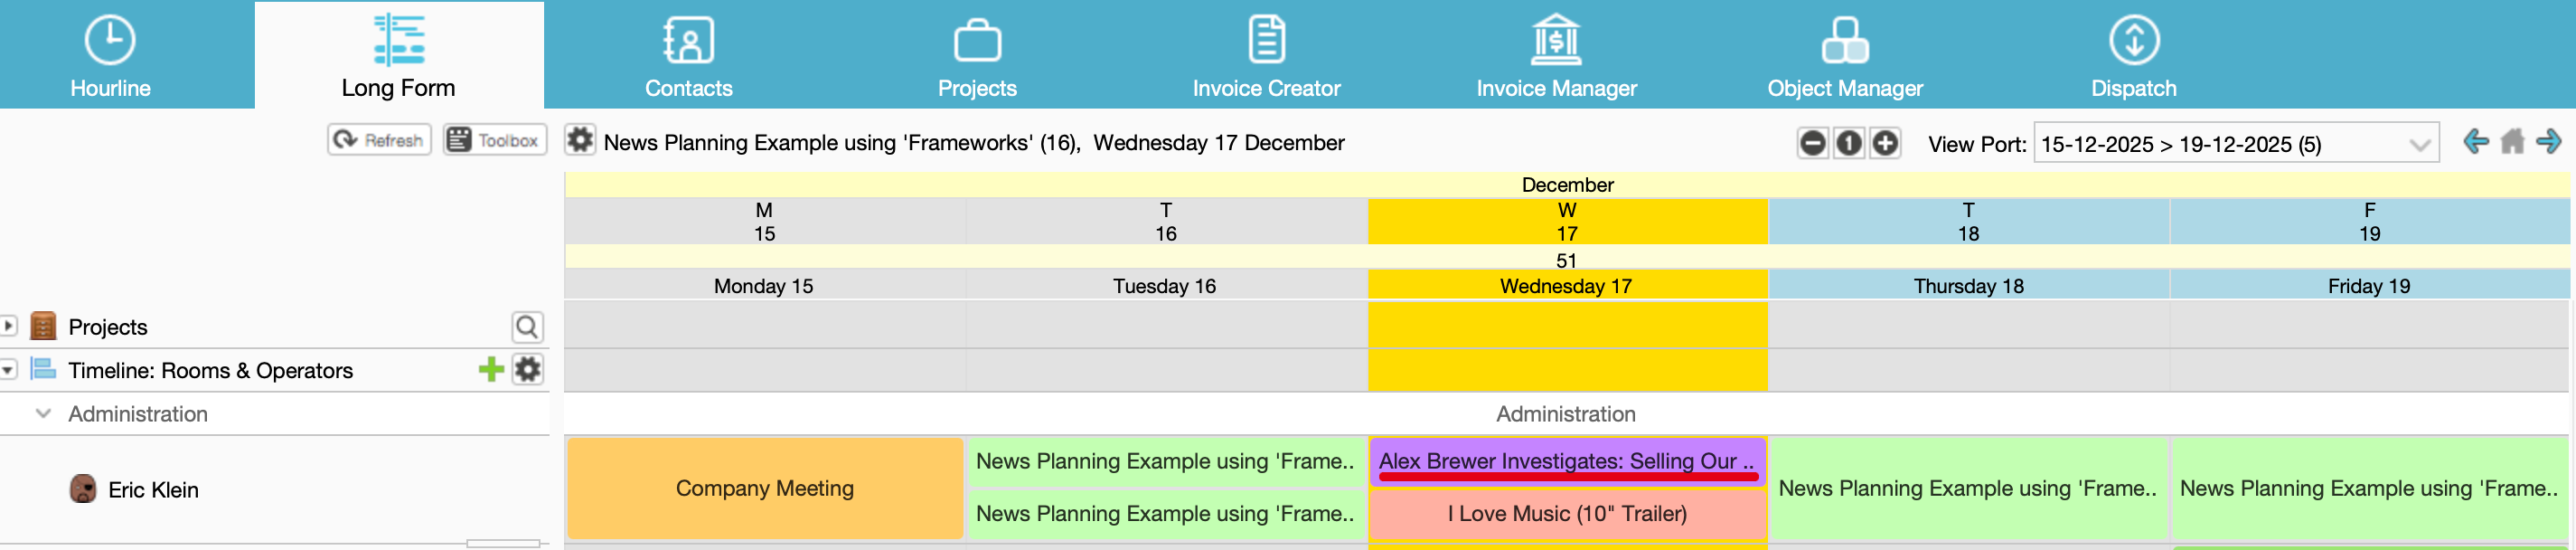
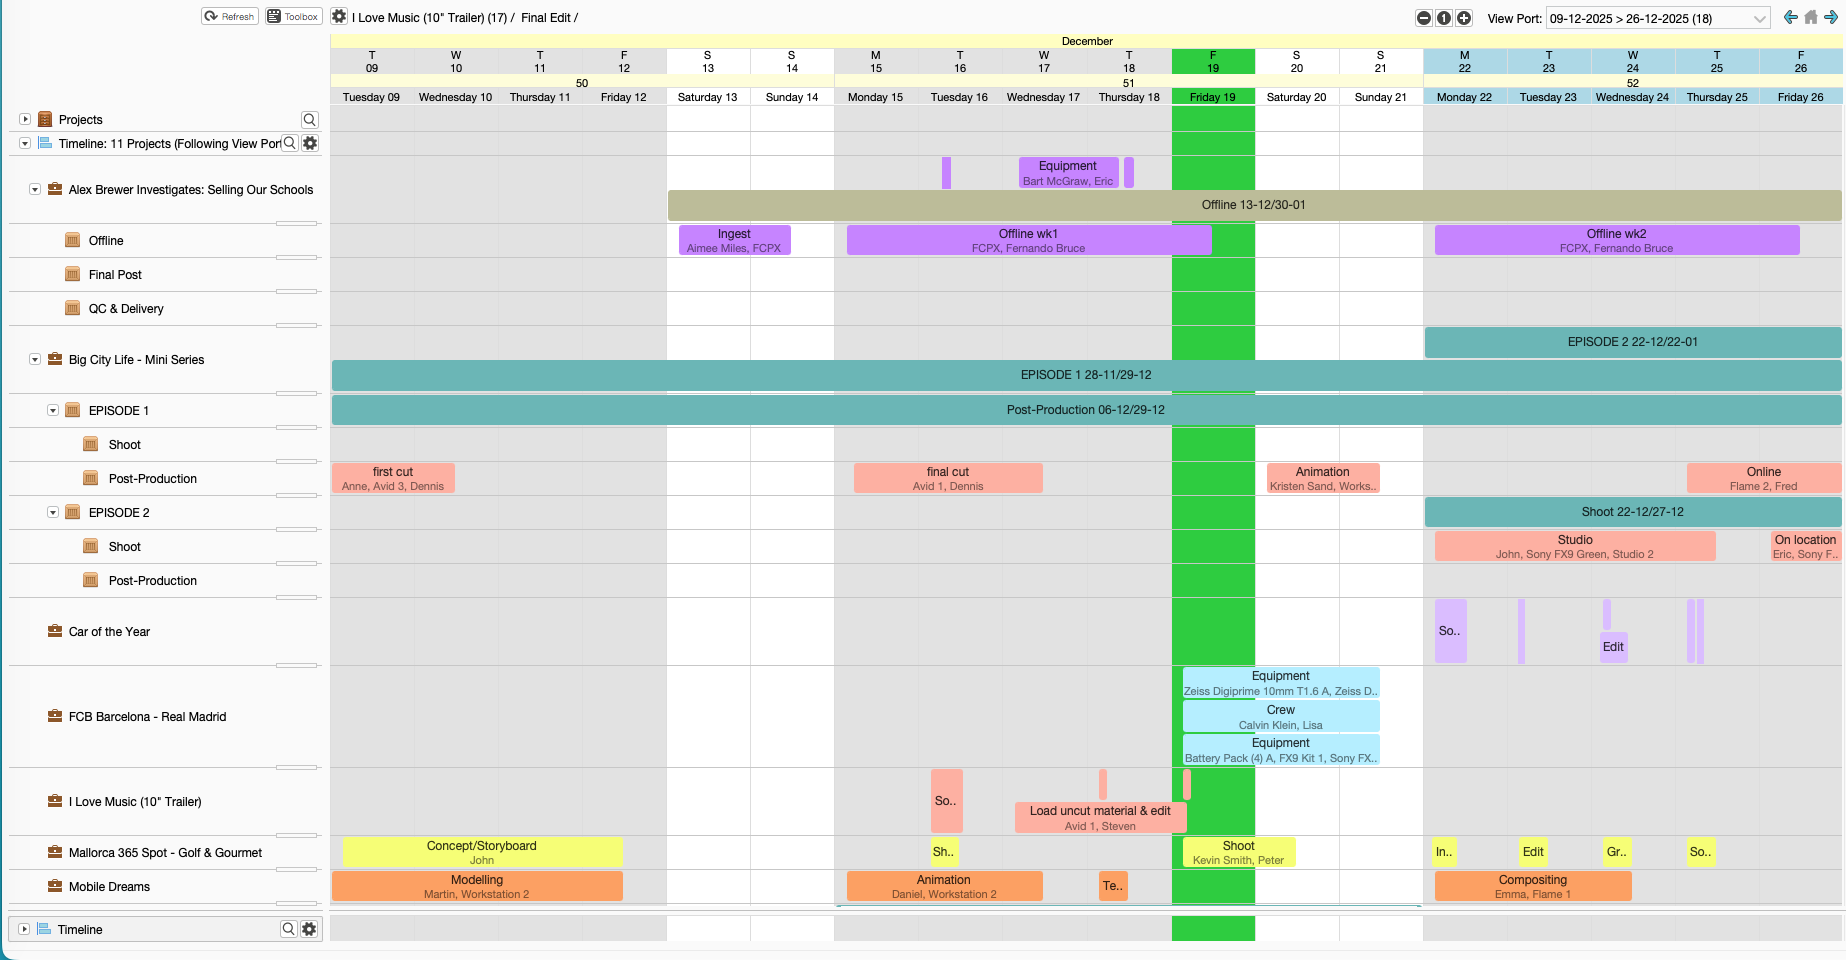
View Projects in Timeline
You can now add projects into the Timeline. They show as single line for the project with all its bookings stacked.
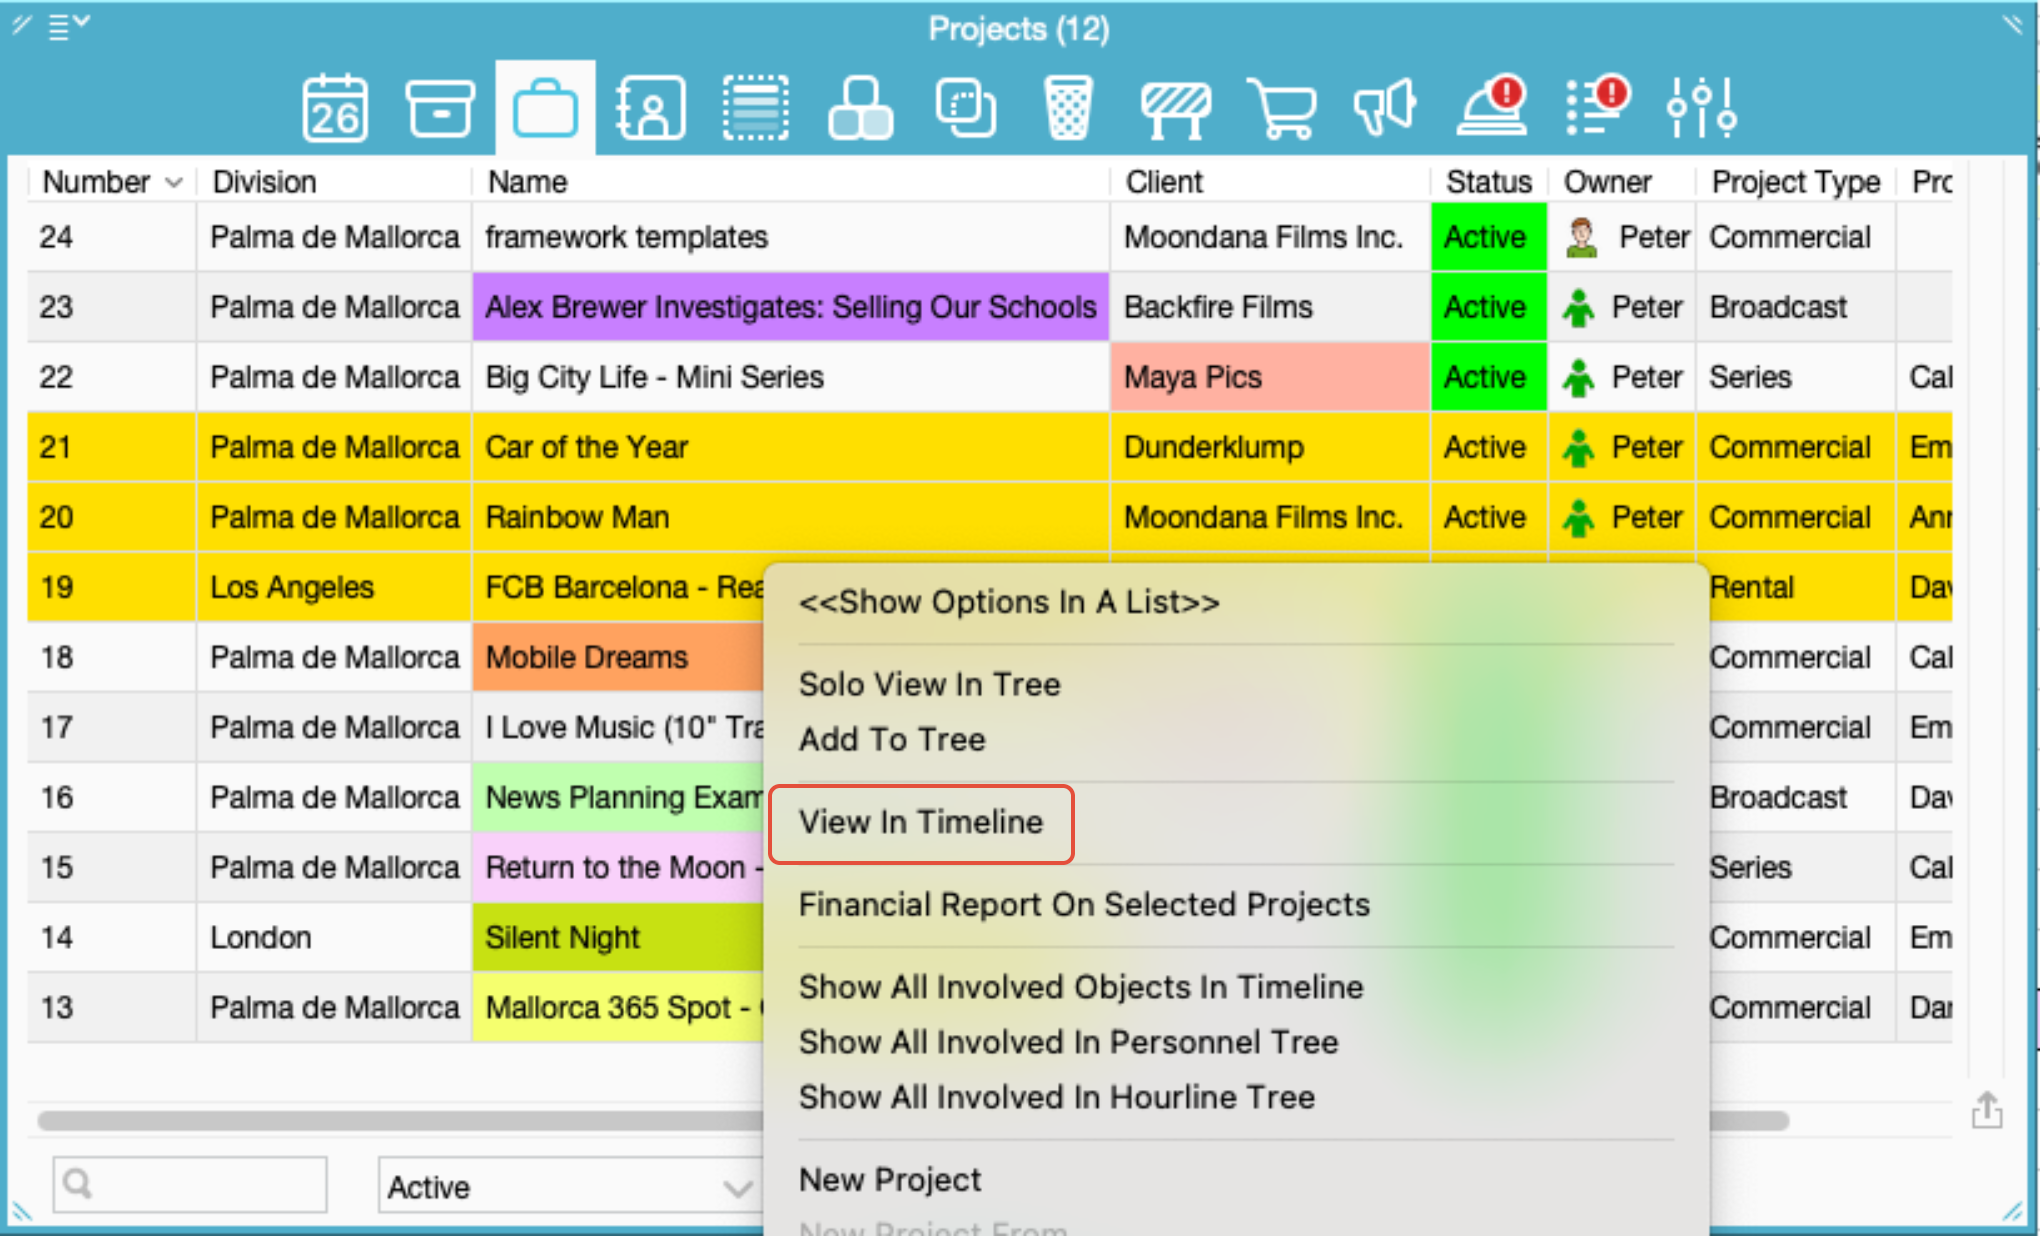
- Click on a Project icon > View in Timeline
- From Toolbox > Projects select one or multiple projects (shift) + right click > “View in Timeline”
- Hold shift or control you’ll get “Add” instead of view into list, when selecting projects in Toolbox > Projects.
- Drag and drop multiple projects to the object view
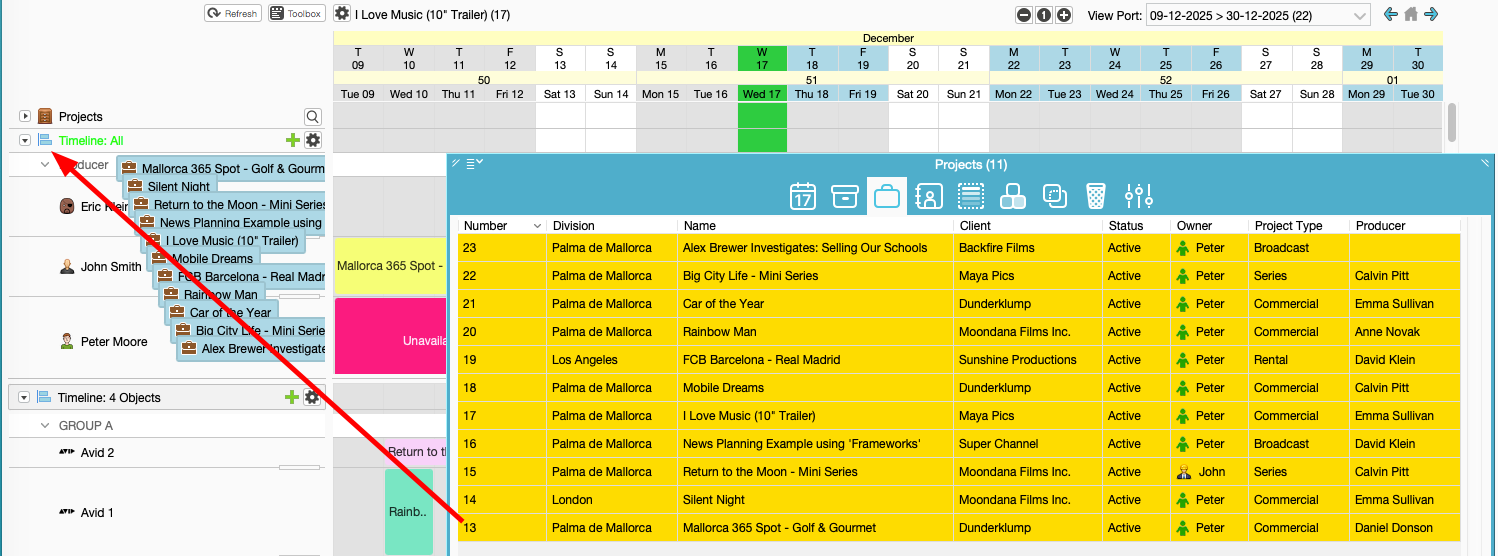
Show all Involved/booked Objects in Timeline: from the Project in Project Tree or Timeline
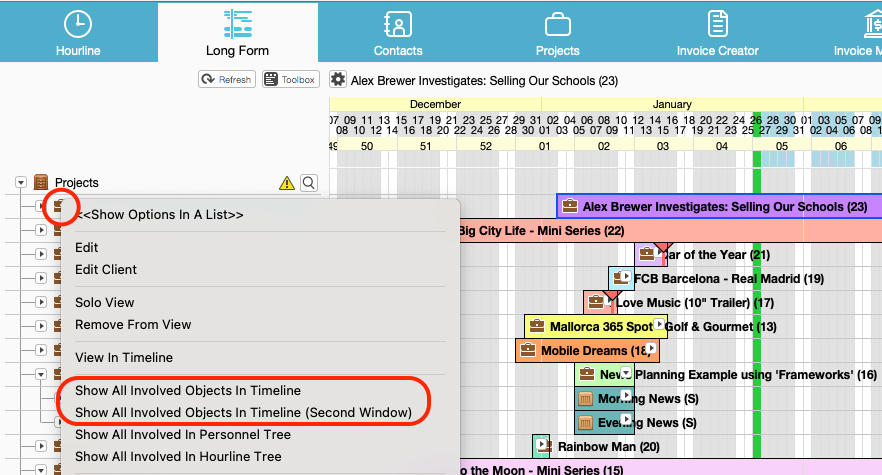

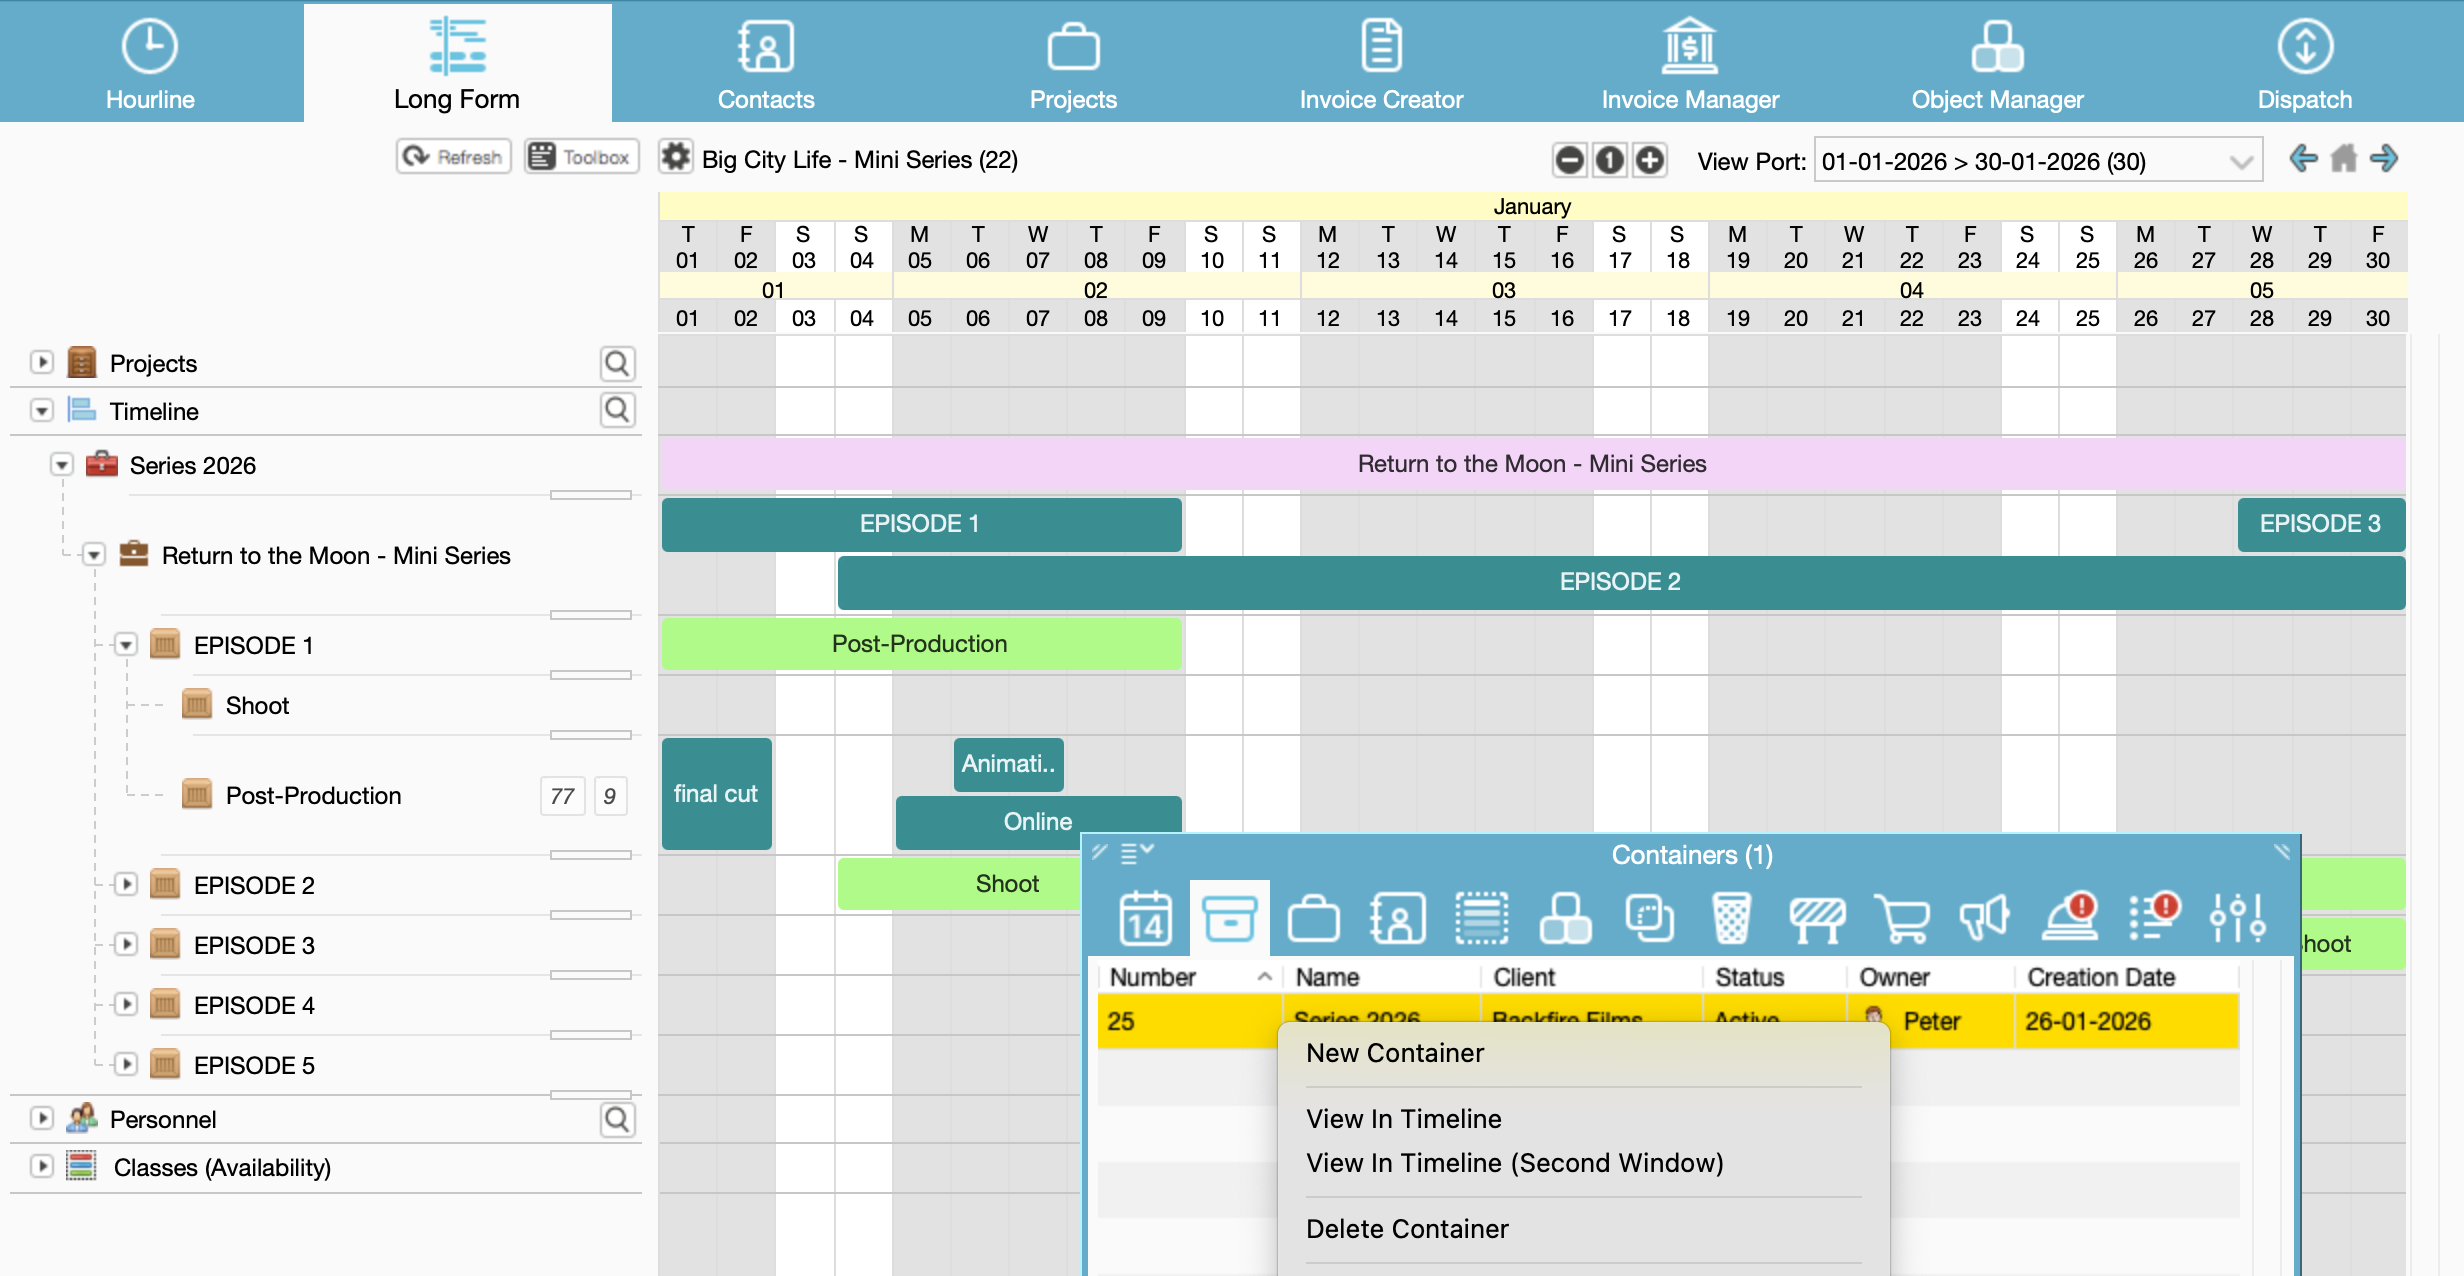
It's also possible to view Container & Projects in the new Timeline in a Tree structure. Simply add the Container to the Timeline view:
Settings/Functions
Clicking the new Timeline Icon you can access an extended menu to control what is displayed in the timeline.
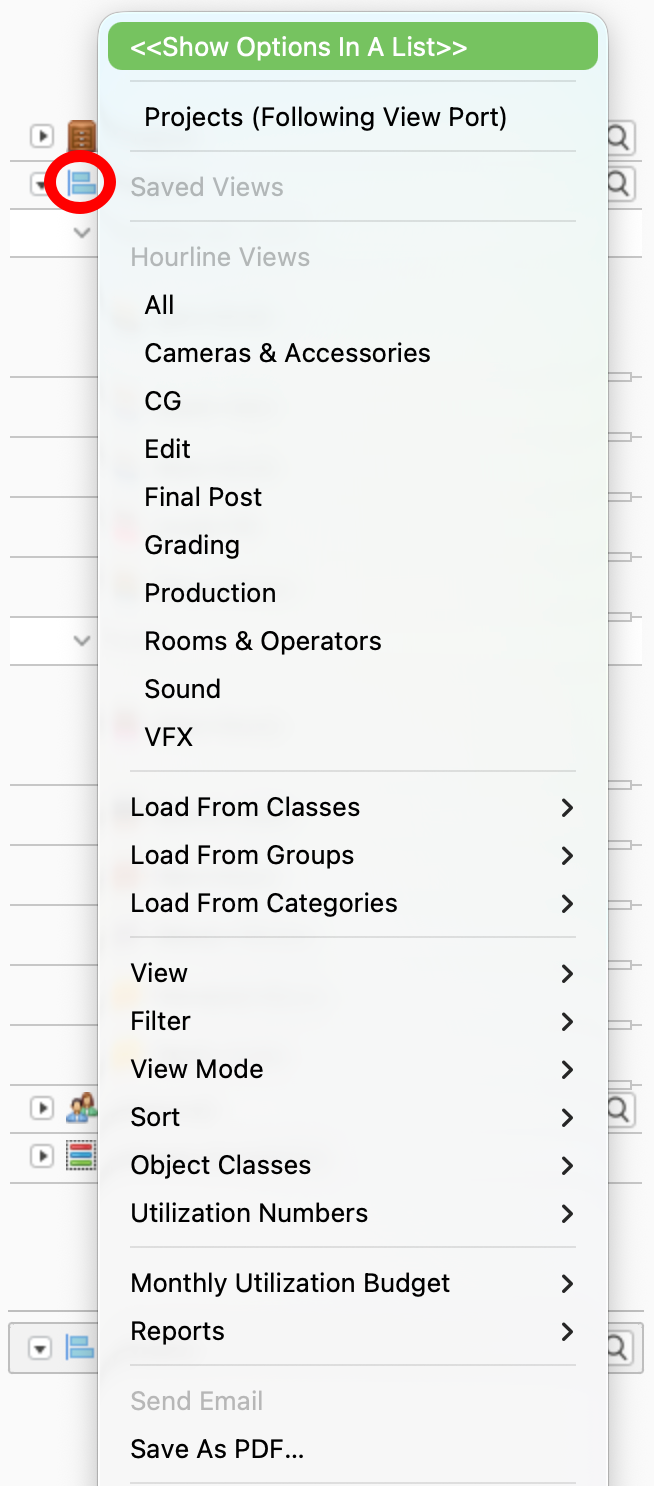
Projects (Following Viewport):
- When enabled, the Projects Following Viewport option automatically loads and displays only the projects that contain bookings or assigned objects within the date range currently set in the viewport.
- This option ensures that the Second Object Tree stays synchronized with the visible scheduling period, displaying only the relevant projects as you navigate through the calendar.
Load
Load own or shared Hourline Views directly into the timeline.
Load views by Classes, Groups, or Categories, allowing you to quickly switch context depending on your workflow.
Select predefined Hourline views such as Edit, Production, Sound, VFX, or display All objects at once.
Load items using:
Load From Classes
Load From Groups
Load From Categories
View - Adjust how items are displayed in the timeline.
 Save View / Remove View
Saves the current configuration of groups and objects, similar to how saved views work in the Hourline.
Saved views can be accessed by clicking the eye icon in the Saved Views section.
Clear View
Removes all items currently displayed in the Second Object Tree, giving you a clean workspace.
New Grouping, to create new groups to organize your objects in a fully customized way, Adding either directly from the toolbox or by dragging them from the top object tree view or Project Tree.
Sort Items from A-Z
Expand / Collapse All
Expands or collapses all groups in the Second Object Tree at once.
Copy From Another User - copy saved Timeline views from other users.
Include Inactive when Loading - if using the options to "Load From" it will either include to list inactive objects in that class/group/category or not
Sort By Name When Loading
Load Classes As Groupings
Show Separate Icon/Popup For Settings And Actions - show the separate gear icon with the functions instead of built in to the left hand Timeline icon

Filter - filter the list by criteria:
With Bookings
Without Bookings
Preliminary
With Conflicts
By Divisions
By Dispatched Divisions
View Mode - Switch between different visual or status-based modes. Applies to EMT only.
Verified
Verified / Checked Out
View availability on Groups
Sort Change the ordering of items in the timeline
 Sort by Name
Sort by Current Dispatched Division (EMT only)
Sort Projects By Start Date
Sort Users by First Shift (7.4) - when enabled, sorts Users by First Shift and groups them together, so it's easy to see which Users are working on the same shift from the earliest to the latest.
Object Classes – Control how classes are displayed
 Load Classes As Groupings ON: When adding the Class a grouping is automatically added with the class members:
Load Classes As Groupings OFF: Loading "pure" class and shows Member Events depending on next settings:
- Show Member Events When Collapsed: ON

- Show Member Events When Expanded: ON

- Show Member Events When Collapsed: ON
Utilization Numbers - Display booked utilization metrics based on:
Total Days
Total Hours (clicking on the total hours it will toggle on off the per day hours)
Hours Per Day
Hours Per Week
Project and task bookings are counted only if they are confirmed. If there is a conflict, the conflicting booking is not included, unless it is force confirmed.
Personnel bookings marked as “All day” are calculated as 24 hours.
Shifts are excluded from all calculations.
If a user or object has multiple bookings on the same day, they are counted as one booked day.

Hoovering mouse over the number (day, week or total) allows to display summary of hour distribution.

Monthly Utilization Budget – View budget-related utilization data.
Reports Generate reports based on the current timeline view and items displayed.
Save as PDF Export the current timeline view as a PDF.
- Start Multi Selecting Bookings
- Cmd (Ctrl on Windows) + Double-click expands all objects involved in the selected project in the top Object Tree, displaying them with a yellow highlight panel.
Scheduling in the Timeline
- Expand/shorten bookings with shift & drag and drop
- You can now slide / drag drop / extend / shorten (use shift for trim) the bookings.
- Swap Objects on Bookings
- Multi select Bookings
Combined with shift patterns, you can see the shifts in the bottom object tree (same as at the top) but now you can split the views, having the top view for you objects and binders, and the bottom for the hourline of your staff/resources
Was this article helpful?
That’s Great!
Thank you for your feedback
Sorry! We couldn't be helpful
Thank you for your feedback
Feedback sent
We appreciate your effort and will try to fix the article