This guide is designed to cover the technical set up of the integration on EntraID and farmerswife, and also explain the user experience.
When EntraID SSO is enabled, Desktop, Web and iOS users will see an additional “Login with Entra ID” button on the farmerswife login screens.
On clicking “Login with Entra ID”, they will be redirected to Entra ID to complete the authentication process (including MFA if configured), and then redirected back to farmerswife on success or failure.
Enhanced and robust security measures such as Multi-Factor Authentication (MFA) and session control can be enforced by Entra settings.
Note: The SSO supports authentication only, not user provisioning or authorisation.
farmerswife does support syncing of users from Entra ID, but this is a separate integration covered in a different article.
For any questions related to Entra ID configuration, we strongly recommend referring to their official documentation.
First, we will cover the configuration on Entra ID, followed by the configuration of the farmerswife server to connect, and some specific instructions needed for the farmerswife iOS app.
Note: If your system is cloud hosted the farmerswife support team will configure the steps on the farmerswife server in Step 2.
- Step 1: Configure the Integration on the Entra ID side
- Step 2: Configuring the farmerswife Server to use SSO
- Entra ID SSO for farmerswife iOS App users
Step 1: Configure the Integration on the Entra ID side
(Previously known as Azure Active Directory)
To integrate farmerswife with Entra ID using OIDC, you’ll need to register an application in Microsoft Entra. This step creates the trust relationship between the Identity Provider (Entra ID) and the Service Provider (farmerswife).
For more details, refer to Microsoft’s official documentation: https://learn.microsoft.com/en-us/entra/identity-platform/v2-overview
In summary, follow these steps:
- Go to the Microsoft Entra Admin Center.
- Navigate to Identity > Applications > App registrations.
- Click + New registration.
- Fill in the required fields:
- Name: Choose a meaningful name for your integration. E.g Farmerswife SSO
- Supported account types: Select based on your organization’s needs (e.g., Accounts in this organizational directory only).
- Redirect URI: Set this to:
https://{{fw-server-app-URL}}:{ApiPort}/oidc/callback
Replace {{fw-server-app-URL}} with your actual Farmerswife server address. Int he case of cloud hosted farmerswife this will be a URL starting with https://api. Please contact support@farmerswife.com to confirm the address to use.
- Click Register.
Once the app is registered, go to Certificates & secrets and:
- Generate a Client Secret and copy it securely.
Note: If this is later changed for some reason, since v7.2 This can be updated from fw Client app side during run-time:
https://support.farmerswife.com/en/support/solutions/articles/17000146340-update-entra-id-client-secret-key
Then, under Overview, copy the following values:
- Application (client) ID
- Directory (tenant) ID
Also, you’ll need the Issuer URL, which can be derived as follows:
https://login.microsoftonline.com/{tenant_id}/v2.0
Replace {tenant_id} with your actual Directory (tenant) ID.
For more information: https://learn.microsoft.com/en-us/power-pages/security/authentication/openid-settings
Step 2: Enable farmerswife to use Entra ID SSO
Option a) For farmerswife cloud-hosted systems
For farmerswife cloud-hosted systems, complete the necessary steps as outlined above on Entra side.
Once done, send the information from the table below to your assigned farmerswife Product Specialist or support@farmerswife.com. This data will be used to configure your system.
Option b) Only for self hosted farmerswife systems
For self-hosted farmerswife systems, gather the information to complete the table to have on hand for the setup process.
Pre-requisites for farmerswife
Your farmerswife system needs to be running on v7.1 (7.1.1000-0- released 28th of August 2024) and later.
- Domain Name
To enable this setup, the farmerswife Server application must be configured to use the optional server.cfg file (more info here).
In this configuration file, the HTTP_HOME setting should point to your qualified domain name (FQDN):
HTTP_HOME https://owndomainname.com
Additionally, within the farmerswife Server application, navigate to Setup > General and ensure the URL To Server field is populated with the fully qualified domain name (FQDN).

Configure farmerswife to use Entra ID SSO – OpenID Connect
- Open your running farmerswife Server application.
- Navigate to: Setup > General > Users tab > “OpenID Connect” section
- Populate the fields exactly as shown in the example provided, Enabled Yes, and select Provider = Entra

Onboarding Entra ID users into farmerswife
For the Desktop Client, the "Get Server Info" needs to be enabled.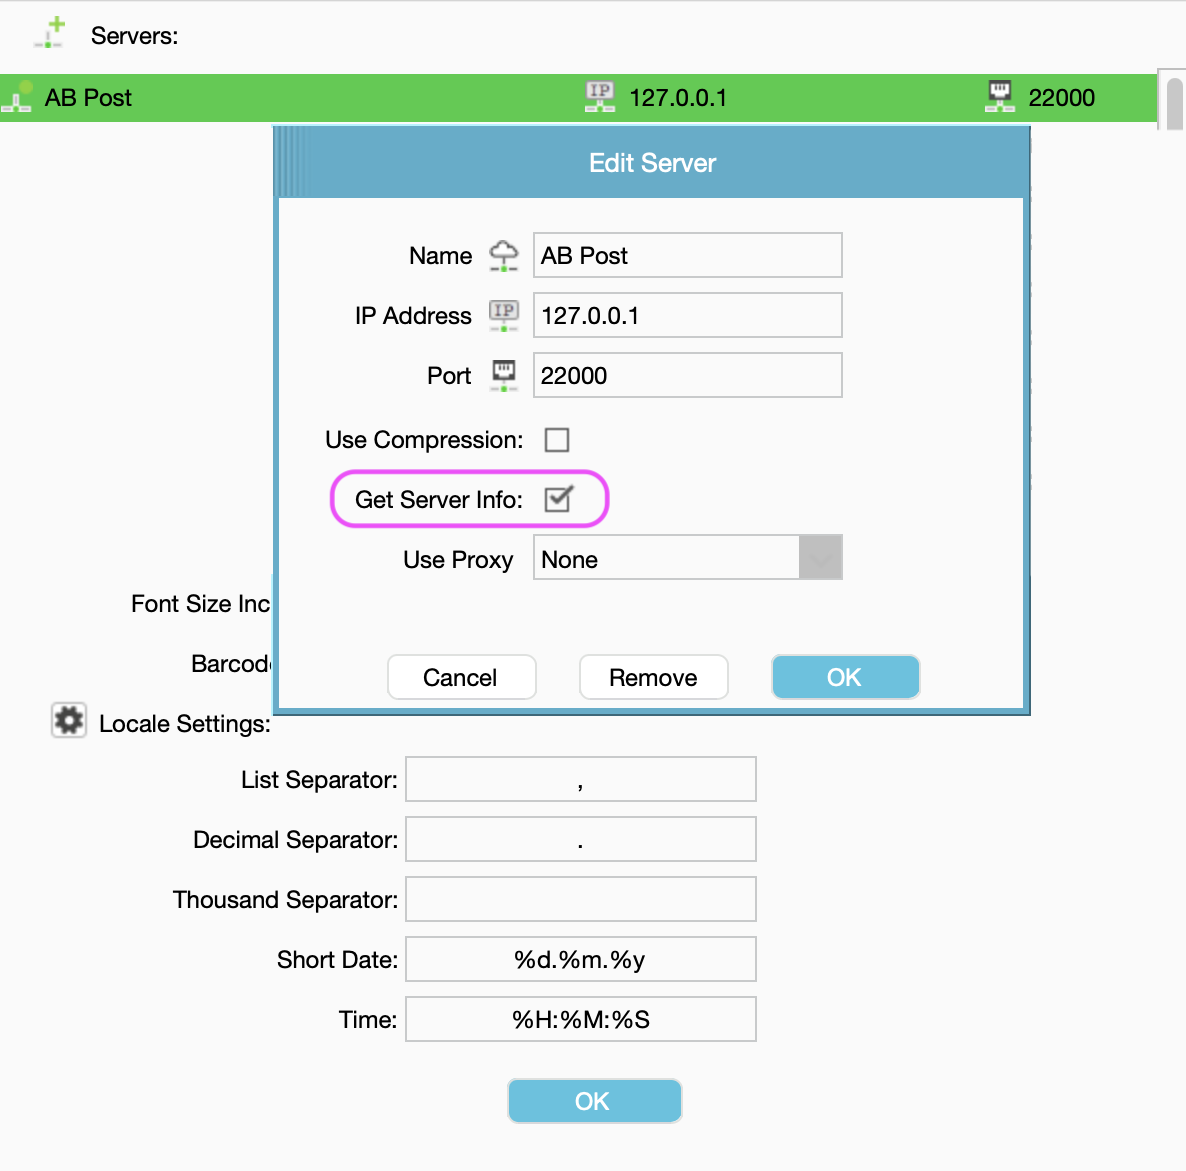
 The Entra ID login prompt will show up, requesting your username and password:

If the setup has been completed correctly, the redirect back to farmerswife will log directly into the desktop, or Web Client login page.
You are in! (Below is the Web Client example)
Entra ID SSO for farmerswife iOS App users
On your iOS device go to Settings > farmerswife and here ONLY configure the "SERVER" connection details using Address and Port (the API Port value)
Please contact support@farmerswife.com if you don’t know the connection details.
- Keep the "Username" and "Password" fields empty
- When you then launch the iOS FW App use the "Login with Entra ID" option:

- You will need to authenticate with your Entra ID credentials, and MFA as configured on Entra ID
- And then you will be asked to redirected to FarmersWife

Congrats! You are in!

Was this article helpful?
That’s Great!
Thank you for your feedback
Sorry! We couldn't be helpful
Thank you for your feedback
Feedback sent
We appreciate your effort and will try to fix the article