This article will walk you through the configuration and use of the Xero Online Integration in farmerswife available from v7.4.
The Xero integration is a separate licensed feature, so please contact support@farmerswife.com if you would like to add this to your license.
Pre-requisites
- Your farmerswife server should be running on at least 7.4 (Beta).
- You should have a farmerswife license installed with Xero enabled.
- You should have a Xero Online Developer Account. (See quick steps to set up this free account at the end of this article, if you do not already have one).
- You will need to note your Xero Client ID & your Xero Customer Secret after registering the app in the Xero Online Developer Account.
- If you wish to set up the Syncing of an invoices "Paid" status, you will also need your Xero Webhooks Key.
Registering farmerswife as a Web App In Xero
- Register the application at https://developer.xero.com/app/manage
- Proceed by adding a New App
- Choose Web App.
- Enter the Company or app URL you will use.
- e.g. https://www.yourdomain.com
- and the Redirect URL (see below for format)
- The client ID is automatically created after the app is created and you need to generate the client secret from the 'Configuration' option inside your application on the developer portal.
Setting Up of Required URLs in Xero Developer Account
Fetch your Xero Connection Details
In Xero, go to your Apps and navigate to Configuration settings. Here you will need to enter a Redirect URL. This should follow the below formats:
Redirect URL:

For self-hosted customers:
https://[yourdomain]:[ApiPort]/oidc/callback

-

For Clouded customers:
https://api.[yourdomain].cloud.farmerswife.com/oidc/callback

Syncing Invoice Paid Status with fw
If you wish to sync the "Paid" status of your invoice from Xero to farmerswife, you should then navigate to the Webhooks settings. This is an optional configuration. Here you will need to enter a Delivery URL. This should follow the below formats:
Delivery URL:

For self-hosted customers:
https://[yourdomain]:[ApiPort]/api/v1/webhook/xero

-

For Clouded customers:
https://api.[yourDomain].cloud.farmerswife.com/api/v1/webhook/xero

You should also specify "Invoices" as the event type that will trigger Webhook notifications.
Configuring the farmerswife Server
Please Note: If you are a clouded customer, this will be configured by farmerswife Support.
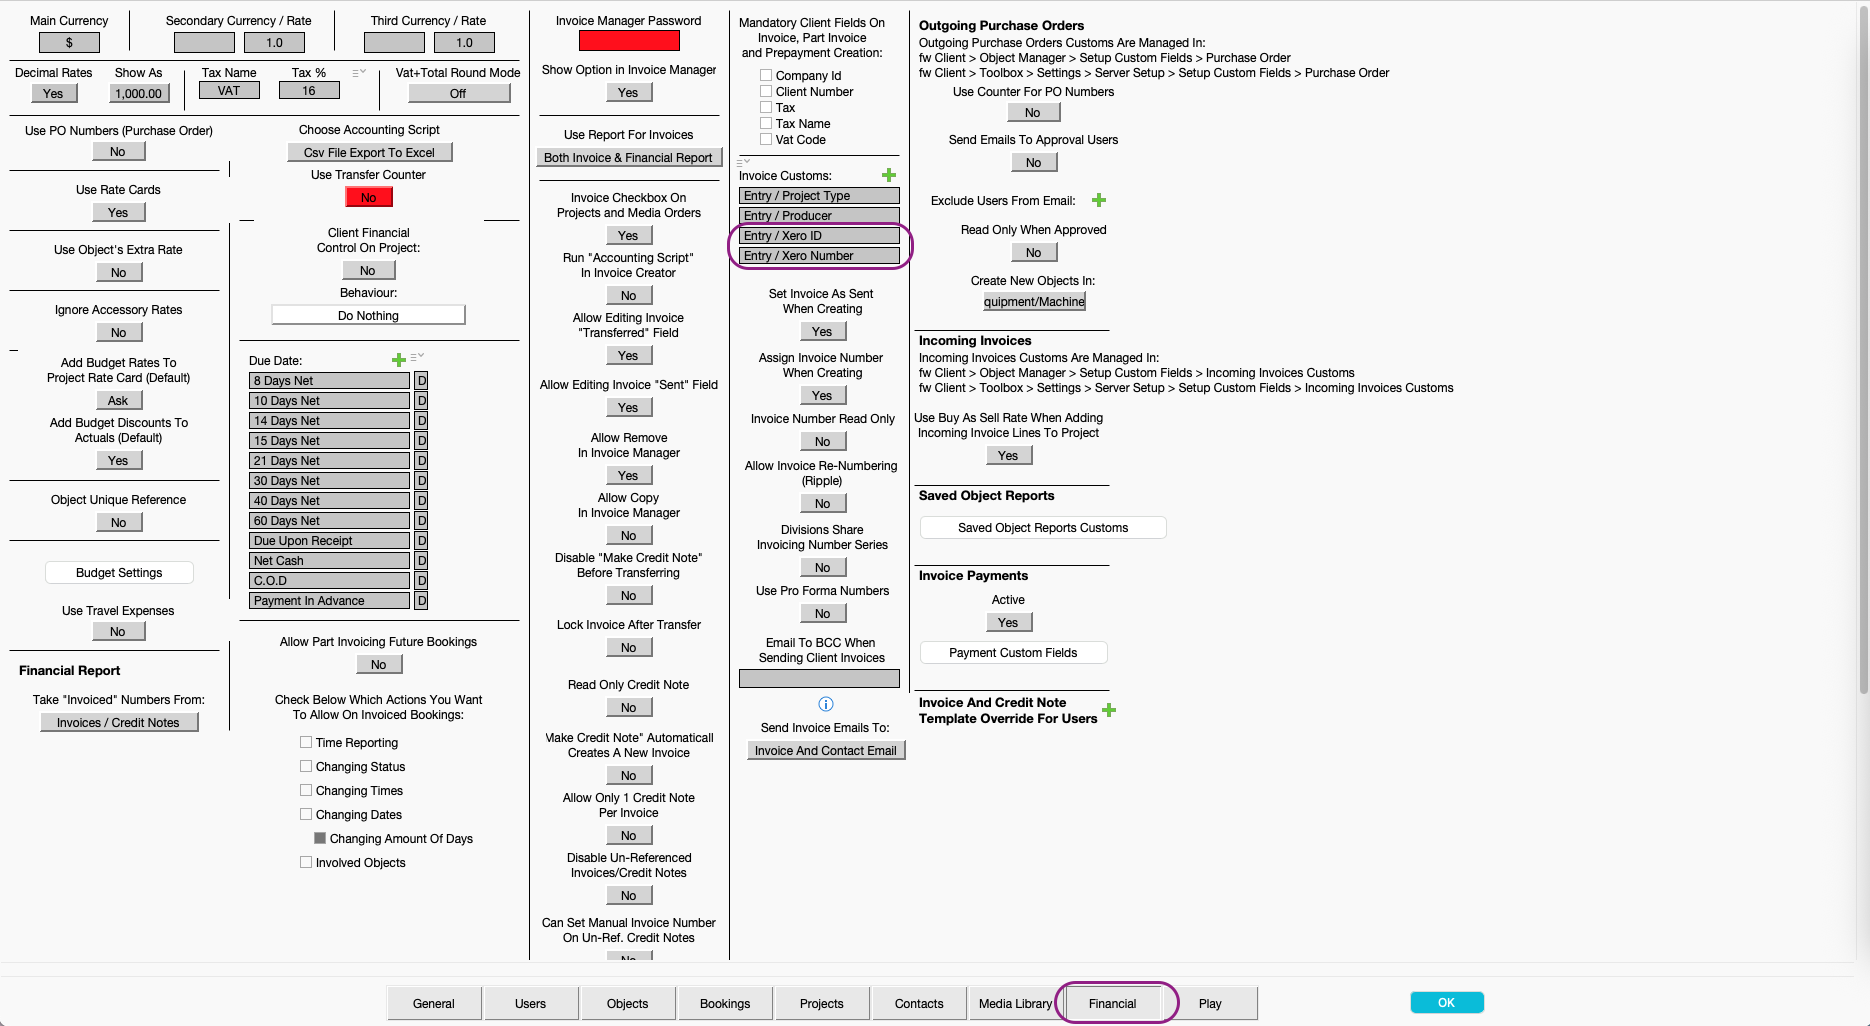
On the farmerswife Server application, navigate to the Financial tab, and locate the Invoice Customs section. Here you should add at least the following two fields (these will be used for mapping later):
- Xero ID (an Entry field used as the internal Xero unique identifier for the invoice)
- Xero Number (an Entry field which is displayed to users as the invoice number in Xero)
Once the fields have been added, click OK to restart the farmerswife Server.
Configuring the Connection to Xero in farmerswife
- In farmerswife Desktop Client as an Admin with access to Server Setup, navigate to Toolbox > Settings > Server Setup > Financial > Enable Xero Online
- Click Setup, which will open a simple window where admins should enter:
- Client ID
- Client Secret
- OAuth2 Redirect URL (copied from above)
- Webhook Key

- After filling in this information click Connect to Xero. A browser window will open requesting access to your organisation's data and user account information.

- Once access is granted, Xero is connected to farmerswife.

- In the farmerswife Toolbox, click the Fetch Xero Tenants button. Select as default the tenant from your organisation.
Configuring Xero Products and Services Mapping
- For proper mapping between farmerswife and Xero, the service names and invoice item names (products and services) are defined by the "Ref" in farmerswife and "Code" in Xero.
- Mismatches will trigger a validation message upon clicking "Send To Xero."
- From the invoice creator/manager: if you change the name on an invoice line, that value will appear in Xero in the "Description" column, while the referenced item on the Xero invoice remains the product/service (matched via "Code")
- Name: “cirkus” / FW Ref: “cirkus” / Xero Code: “cirkus”
- Name: “fw” / FW Ref: “fw” / Xero Code: “fw”
- In Xero > Sales > Product and Services > Edit, you should add the exact item names from farmerswife.
Customer Mapping
The Customer name in Xero must be exactly the same as the FW Client/Company.
When sending an invoice from farmerswife to Xero, the Customer data displayed on the Xero invoice is retrieved directly from the Xero Customer Hub.
To alter this in Xero, navigate to Sales > Customers > Edit.
Sending Invoices to Xero from farmerswife
- In Invoice Creator/Manager select one or multiple invoices.
- Editing the description of the items will not change the REF number used for mapping.
- Right click or click menu.
- Choose "Send to Xero" for selected invoices to transfer the selected invoices to Xero.

Next, farmerswife will:
- Validate that "Xero Id" and "Xero Number" custom fields, Customer and Products and Services exist before exporting.
- Prompts for OAuth2 authorisation if needed.
- Post each invoice to Xero and writes back the returned identifiers.
- Updates the transferred status of the invoices.
- A new Invoice custom field “Xero Number” and "Xero Id" are auto-filled when creating the Xero invoice, but can be used to link existing invoices.
Working with Transferred Invoices
When an invoice already has a Xero ID, the Invoice Editor window shows a Xero button that launches the corresponding invoice in Xero, using sandbox or production URLs as configured.

Display and filter transferred Invoices
In Invoice Manager, Search results > click the Menu icon > Edit View to add the "Transferred" column to your Invoice View.

How to Create a Xero Developer Account
You can follow the steps in the Xero Documentation: https://developer.xero.com/documentation/getting-started-guide/
You can then go to this url https://www.xero.com/signup/developers/ to sign-up for your free Xero Developer account.
Was this article helpful?
That’s Great!
Thank you for your feedback
Sorry! We couldn't be helpful
Thank you for your feedback
Feedback sent
We appreciate your effort and will try to fix the article