This article will walk you through the configuration and use of the Quickbooks Online Integration in farmerswife available in v7.3. The QuickBooks integration is a separate licensed feature. Please contact sales@farmerswife.com for pricing information.
TABLE OF CONTENTS
Pre-requisites
- farmerswife server running on 7.3
- farmerswife license with QuickBooks enabled
- QuickBooks Online account
Step 1: Configure Toolbox
In farmerswife Desktop Client as an Admin with access to Server Setup, go to Toolbox > Settings > Server Setup > Enable QuickBooks Online
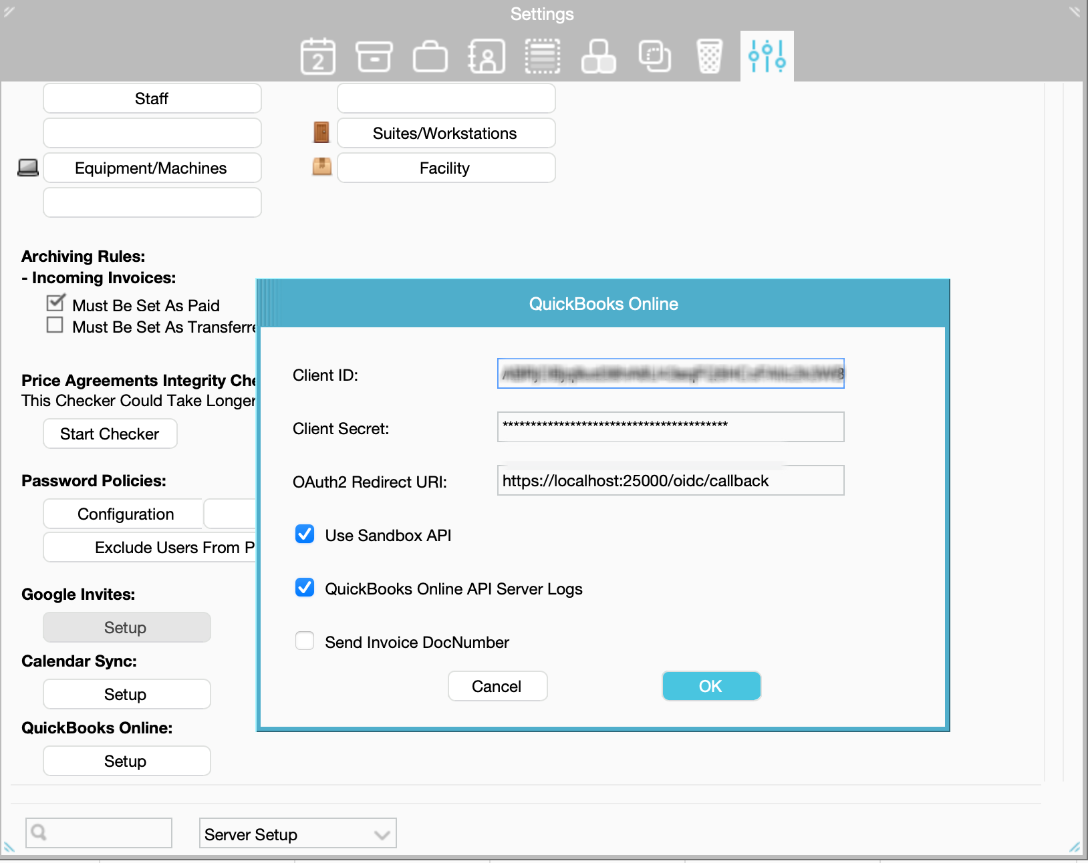
Open Toolbox > Settings > Server Setup > QuickBooks Online: this is a simple window where administrators enter the Client ID, Client Secret and OAuth2 redirect URI, toggle sandbox mode, enable API logging and control whether the invoice DocNumber is sent.


Step 2: Add Invoice Custom fields to farmerswife
Add minimum the following fields to the Invoice Custom fields:
- QuickBooks Id
- QuickBooks Number
Step 3: Configure QuickBooks Services mapping
For proper mapping between farmerswife and QuickBooks, the service names and invoice item names (products/services) are defined by the "Ref" in farmerswife and QuickBooks "SKU".
Mismatches will trigger a validation message upon clicking "Send To QuickBooks."
From the invoice creator/manager: if you change the name on an invoice line, that value will appear in QuickBooks in the "Description" column, while the referenced item on the QuickBooks invoice remains the product/service (matched via SKU)
Name: “Cirkus” / FW Ref: “cirkus” / QuickBooks SKU: “cirkus”
Name: “fw” / FW Ref: “fw” / QuickBooks SKU: “fw”
In QuickBooks Online > Sales > Product & Services > Edit, add the object exact names from farmerswife.
Note: you can Export the Services from farmerswife Object Manager and use the Batch action in QuickBooks.

FW View:
QB View:

Step 4: Customer mapping
In QuickBooks Online > Customer Hub > Customers > Edit
Customer name in QB Application must be exactly the same as the FW Client/Company

When sending an invoice from farmerswife to QuickBooks, the Customer data displayed on the QuickBooks invoice is retrieved directly from the QuickBooks Customer Hub.
This includes the following information stored in QuickBooks:
Company Name
Contact Email
First and Last name
Phone
Street Address
City, State, ZIP Code
Country
Notes
and other customer details stored in the QuickBooks Customer Hub
Step 5: Select and send invoices to QuickBooks Online
In Invoice Creator/Manager select one or multiple invoices.
You can edit the description of the items, the REF number will not change.

Right click or click menu.
Choose "Send to QuickBooks" actions for selected invoices to transfer the invoices to QuickBooks.
Next, farmerswife:
- Validates that "QuickBooks Id" and "QuickBooks Number" custom fields exist before exporting
- Prompts for OAuth2 authorization if needed,
- Then posts each invoice to QuickBooks and writes back the returned identifiers.
- Updates the transferred status of the invoices
A new Invoice custom field “QuickBooks Number” is Auto-filled when creating the QBO invoice, but can be used to link existing invoices.


Open QuickBooks Invoice
Invoice Edit Window: When an invoice already has a QuickBooks Id, the editor shows a QuickBooks button that launches the corresponding invoice in QuickBooks Online, using sandbox or production URLs as configured.

Display and filter transferred Invoices

Orientative Data Mapping
Data in farmerswife QBO /invoice API Location
Clients and Items mapping: If a Customer or Item referenced in the invoice does not exist in
QBO by matching the name, farmerswife will validate this and show a validation message to the
user after clicking “Send To Quickbooks”
Invoice > Number DocNumber
Invoice > Date TxnDate
Client > Company CustomerRef.value (Name matching)
Invoice > Currency CurrencyRef.value
Invoice Line > Description Line[].Description (Name matching)
Line > Qty Line[].SalesItemLineDetail.Qty
Line > Unit Price Line[].SalesItemLineDetail.UnitPrice
Line > Net Line[].Amount
Tax > Amount TxnTaxDetail.TotalTax
Service > Code Line[].SalesItemLineDetail.ItemRef.value
Was this article helpful?
That’s Great!
Thank you for your feedback
Sorry! We couldn't be helpful
Thank you for your feedback
Feedback sent
We appreciate your effort and will try to fix the article

