An Incoming Invoice for a PO can be created at any time; there is no need to wait until the PO has been linked or set to inactive.
The recommended workflow for tracking planned costs is to use a PO when the item is purchased or the service is agreed upon, and then link an Incoming Invoice to that PO when the supplier's invoice arrives.
However, there is also a simpler workflow that bypasses the whole use of POs and links Incoming Invoice lines directly to Projects (through the corresponding Quantity, Unit and Rates). Each line can be split onto multiple Projects with different Quantities and Totals. Each link can be individually approved/rejected by the respective Project Owner (i.e. the User who created the Project).
See all available options here below.
CREATING A NEW INCOMING INVOICE
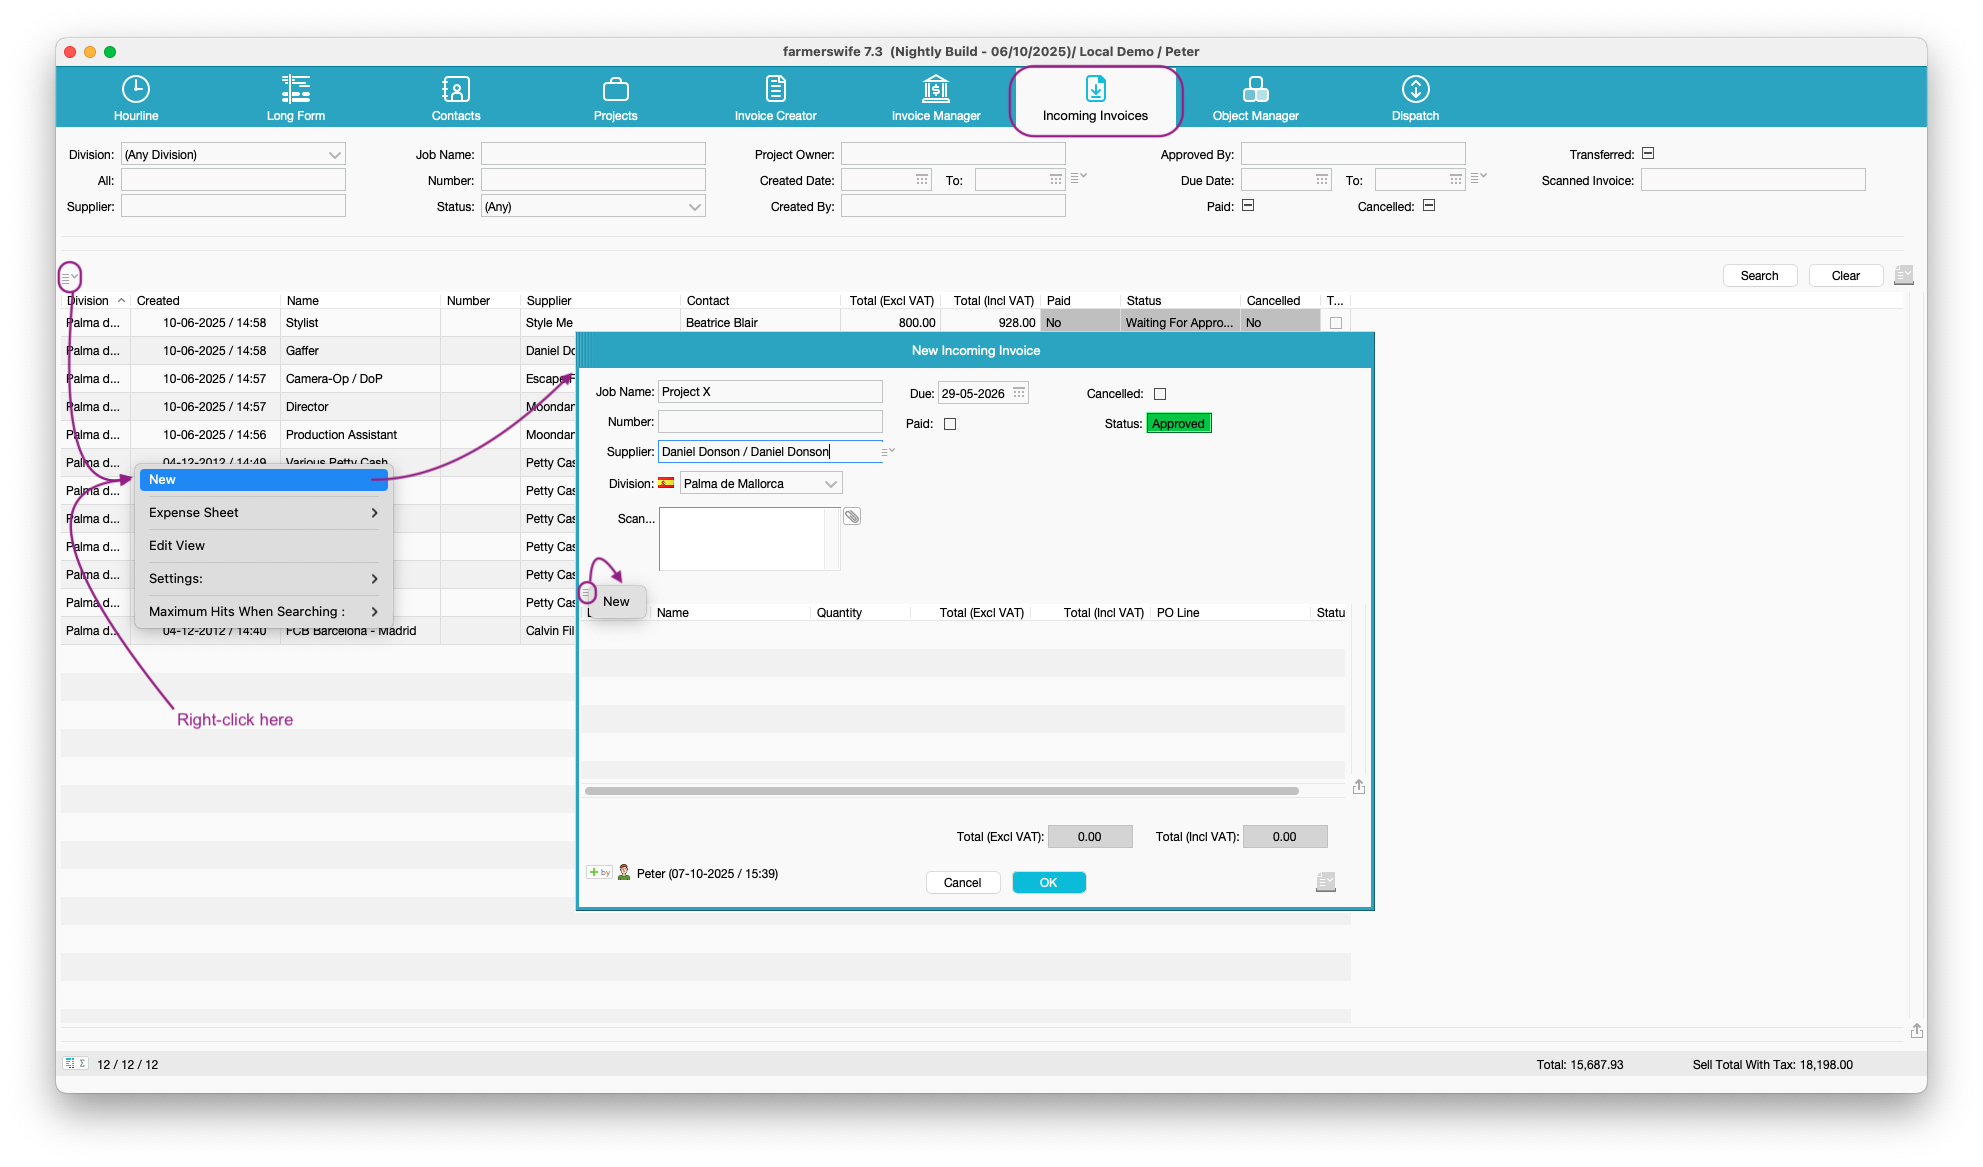
Open the Incoming Invoices module through the Module Bar. (If it is not displayed in your Module Bar, open your Toolbox Settings, go to the Display section, and open the Module Bar Setup, and ensure Incoming Invoices is shown on the Selected side).
Click on the burger menu icon (or right click inside of the window) and select New to create a new Incoming Invoice. If using the Divisions module (licensed), when creating a new Incoming Invoice a pop-up window allows selecting the Division for which the new invoice is to be created in.
In the new window, enter the header information with: a Job Name, Supplier Name, Due Date, if it has been Paid, if it has been Canceled and the Status. Custom Fields, if configured, will be displayed. In the example below, a File Custom Field called Scanned Invoice allows uploading of a scanned copy of the original invoice and a Date Custom Field called Invoice Date has been created for adding the original creation date.
Once the header information is filled in, use this window's Burger Menu icon, or right-click in the space, to start adding new lines with details.
There are three options for adding lines:
- Add a line linked to an existing PO line.
- Add a line and forward to an existing Project.
- Add an unreferenced line, not linked to any PO or Project created beforehand.
1. LINKED TO EXISTING PO:
When adding an Incoming Invoice line linked to an existing PO, the header information for this window will be populated from the selected PO.
Select the option Payment For PO Line (shaking hands icon) and click on the PO Line bar to select among the available Purchase Orders for this supplier. As a PO is selected, the details in the header are retrieved from the PO automatically. Next, select the status option for this line: Waiting For Approval, Approved, Rejected. Please see related Permissions articles.

If using Divisions module (licensed), the PO Line selector only shows POs that are in the same Division as this Incoming Invoice.
If an Invoice is only charging for part of the initial PO line, the Quantity and Total can be modified accordingly. Then click OK on the invoice lines window, and OK on the Invoice window.

To add new lines to the same invoice, and account for the remaining costs on the associated PO, re-open the invoice, and create a new line. Selecting the same PO will retrieve the remaining amount and apply this to the new invoice line.

Key Info: allocating the remaining part of a PO can be applied to different invoices. If a PO is sent for two jobs, you could split the costs across invoices for two Jobs, using the above method.
If the amount in the Incoming Invoice Line does not match the Actuals linked to the original PO, a pop-up dialog will warn: 'Warning: The Actuals Linked To The PO Amount To: 2,000 (10 Hours). This II Line Amounts To: 2,400'.

Note that it will still let you input the Incoming Invoice - it's just a warning dialog. The Actuals will not be modified. So if in the end, two more days than the originally added to the PO were needed, and later charged in the Incoming Invoice, you will still need to modify the Actuals manually to reflect the extra days.
If the PO for which you are creating an Incoming Invoice still does not have any Actuals (Booking, Service...) attached to it yet, as soon as you create the Incoming Invoice you will get a dialog saying: 'Warning: The PO Doesn't Have Any Actuals Attached To It Yet.'

The Actual will still not be created, this warning is only so you will remember to create it and link it to the PO.
Finally, note that Incoming Invoices linked to POs can also be created from within the PO window, by selecting one or more POs, clicking on the drop-down arrow on the top left corner and selecting Create Incoming Invoice (Selection:x).

Once the operation is confirmed, a pop-up window informs that the new Invoice will be found in the Incoming Invoice Manager.
2. FORWARD TO EXISTING PROJECT:
To add a line and forward this expense to an existing Project, first fill in all details in the header: browse for the Object to be included, add a Quantity, Unit and Total.
Next, click on the Link To Project icon, and use the Project field that appears at the bottom to search for a Project. The Quantity and the Line Total next to Project are filled in automatically from the top area of this window.

If using Divisions module (licensed), this Project field only shows those Projects that are in the same Division as this Incoming Invoice.
If the line is to be added to an already Closed Project, enable the 'Allow Linking To Closed Projects' option first, by clicking on the drop-down menu under the Link To Project area. Please note that by default Closed Projects are not searchable, because there can be a lot of Closed Projects and it might risk making the application slow.

As soon as you click on the Add button, the Object will be added automatically to the Project. The Sell rate will be the same as the Buy rate or 0, depending on the configuration of the corresponding setting.

At the same time a new line will be created right below the Link to Project area for this Incoming Invoice. Select it and click on the drop down arrow for modifying the Status:
· Waiting for Approval
· Approved
· Rejected
Please see related Permissions articles for more details.
By double clicking on the line the Project opens.
3. UNREFERENCED:
To add a line not linked to an existing PO or related to any Project, just fill in all details in the header: browse for the Object to be included, add a Quantity, Unit and Total. Next select the status option for this line: Waiting For Approval, Approved, Rejected. Please see related Permissions articles.
This example displays an Incoming Invoice with various unreferenced lines listing purchased Material, for which no PO had been previously created. This purchase is not to be related to any Project either.

Was this article helpful?
That’s Great!
Thank you for your feedback
Sorry! We couldn't be helpful
Thank you for your feedback
Feedback sent
We appreciate your effort and will try to fix the article