TABLE OF CONTENTS
- What is iOS QuickBooker
- Pre-Requisite
- Configuration
- How QuickBooker works
- How QuickBooker bookings are created
- Tracking who booked what and when
- Important behaviours to consider
What is iOS QuickBooker
The iOS QuickBooker is designed for teams that need a fast and simple way to book equipment on the fly, without prior planning or approval.
Its main purpose is to allow staff to quickly notify the system that they have taken a specific piece of equipment (for example a camera, car, or accessory), directly from the mobile app.
This makes it ideal for ad-hoc usage, where equipment is picked up as needed during the day.
It is important to note that QuickBooker is not the same as the EMT module:
QuickBooker does not handle physical scanning or check-in/check-out workflows. It simply creates a booking so that usage is visible and traceable in the system.
Pre-Requisite
- Requires EMT license (contact sales@farmerswife.com)
- Requires the farmerswife iOS mobile app - this functionality is not supported on Web or Desktop clients.
Configuration
Step 1: Create and share a dedicated Hourline View for QuickBooker
Create an Hourline View that defines which equipment can be booked via QuickBooker.
1. Create a new Hourline View
In the Hourline menu > go to Options > New Grouping from Class > then select the Class(es) that contain the Objects you want to make available for QuickBooker bookings.
Each selected Class will appear as a folder, with the Objects inside it listed alphabetically.
Objects added through this method cannot be removed individually, so make sure that the selected class includes only the items you want users to be able to book via QuickBooker.
2. Save the view as “QuickBooker”
Options > Save Selection > save this new view with the name “QuickBooker”
Do not tick the Share box.
Note: If the setting "Add Object Class to Grouping from Class in Hourline Views" (in Toolbox > Settings) is enabled, users will be able to book the Class itself via QuickBooker. This setting should be disabled to prevent that behaviour.

3. Assign the QuickBooker view to users
To enable users to book equipment via QuickBooker, the “QuickBooker” Hourline View must be added to their Web Profile.
Open Object Manager and locate the user
Open the Modify User window
Go to Permission Profile > Web Profile Manager
Under “Select & Share Saved Hourline Views”, add the Hourline View “QuickBooker”
Once assigned, the user will see the equipment from this view in the iOS QuickBooker app.

Step 2: Create and share a dedicated Hourline View for DayPlan
1. Create a new Hourline View
- In the Hourline menu > go to Options > New Grouping from Users.
- This usually contains the staff you need to see and their bookings for the day. The view is structured in the same way as the "Day Plan" that you can run from the Hourline Menu.
2. Save the view as “DayPlan”
Options > Save Selection > save this new view with the name “DayPlan”
Do not tick the Share box.
Note: This step is necessary for the QuickBooker to work.

3. Assign the DayPlan view to users
Open Object Manager and locate the user
Open the Modify User window
Go to Permission Profile > Web Profile Manager
Under "Day Plan Hourline Views”, add the Hourline View “DayPlan”

Step 3: Create a Booking Global Status named "QuickBooker"
- Go to Toolbox > Settings > Booking Defaults, and create a new Booking Global Status with the name “QuickBooker”.
- This status will be automatically applied to all bookings created via the QuickBooker workflow.

Step 4: Disable option to remove other people’s bookings
In order to avoid Users to delete other QuickBooker Bookings than their own, set the following variable in the server.cfg to 1:
QUICKBOOKER_ONLY_USER_CAN_REMOVE
if == 1 Only User who booked in QuickBooker can release their respective event
if == 0 A user can release any Booking in QuickBooker view
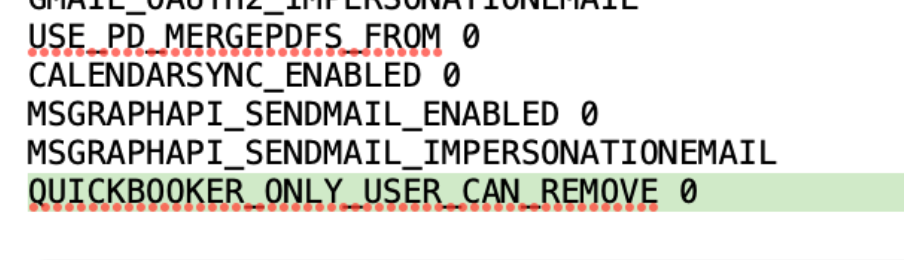
This ensures that users can only remove their own QuickBooker bookings.
Note:
For cloud-hosted farmerswife servers, please contact support@farmerswife.com to have this setting configured, as direct access to the server.cfg file is not available.
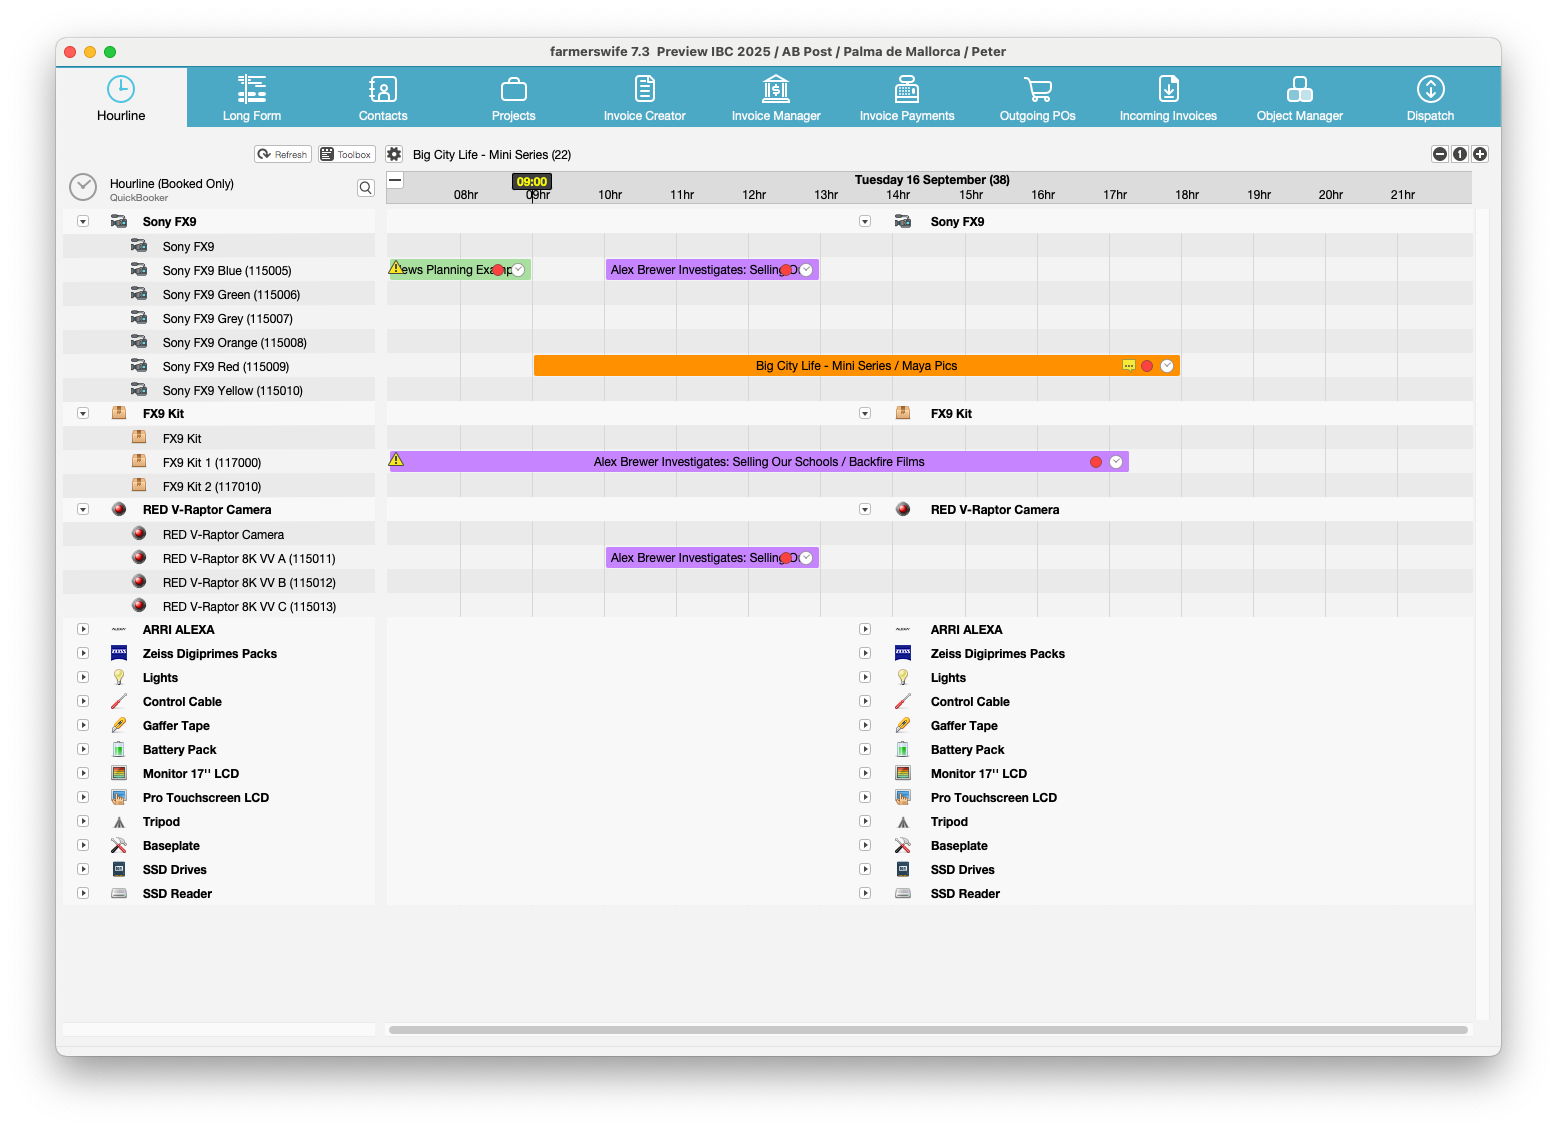
How QuickBooker works
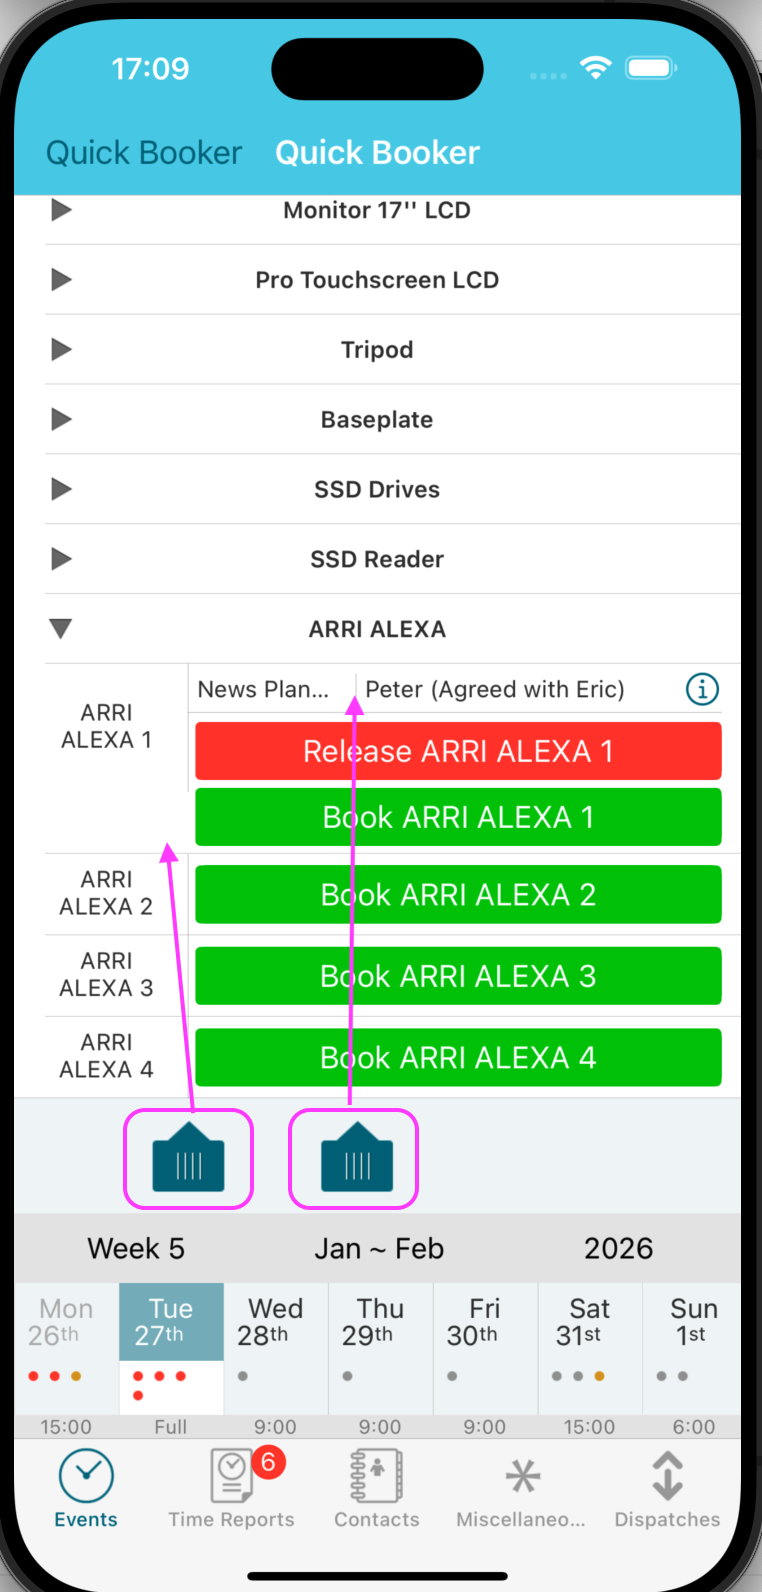 | QuickBooker is used exclusively via the iOS mobile app. Once the configuration described above is in place, users will see two additional tabs in the Events section of the app:
From the app, users can:
|
How QuickBooker bookings are created
Each QuickBooker booking includes only one equipment item.
When a booking is created via QuickBooker, the system automatically applies the following logic:
The booking is linked to the first project the user is booked on that day
The booking is automatically added to a dedicated binder named “QuickBooker”
If the user is not booked on any project on that day, the booking is created as a task booking
The booking status is set to QuickBooker, ensuring that all QuickBooker bookings are easy to identify and filter


Conflict detection
If an object is already booked for the selected time, a conflict message will appear:
1. When trying to book on top of an existing booking, the note prompt pops up, as explained above.
2. After tapping OK, a Conflict window will display: [object] is already booked
3. Tapping Dismiss closes the prompt and the conflicting booking will not be created.
Tracking who booked what and when
All QuickBooker bookings can be tracked in Advanced Project Search.
You can:
Search for bookings by Status = QuickBooker
Filter by date range (for example: last month)
See who booked the equipment, which item, and when
Export the result to csv for reporting or auditing purposes
This makes it easy to review equipment usage and understand who used specific resources over time.
Note: From version 7.3, the booking view will also show the involved users more clearly
Important behaviour to consider
Once a QuickBooker booking is created, users can technically edit the booking to:
Add people
Add additional equipment
Change the project
Change the binder
Change the booking status
These fields are not currently restricted, which means changes are possible. However, users should not modify these values, as doing so breaks the intended QuickBooker workflow.
Note that this limitation may be addressed in future versions.
Was this article helpful?
That’s Great!
Thank you for your feedback
Sorry! We couldn't be helpful
Thank you for your feedback
Feedback sent
We appreciate your effort and will try to fix the article